<?xml version="1.0" encoding="utf-8"?><feed xmlns="http://www.w3.org/2005/Atom" xml:lang="en"><generator uri="https://jekyllrb.com/" version="3.10.0">Jekyll</generator><link href="https://ljn.io//feed.xml" rel="self" type="application/atom+xml" /><link href="https://ljn.io//" rel="alternate" type="text/html" hreflang="en" /><updated>2025-10-14T16:00:05+00:00</updated><id>https://ljn.io//feed.xml</id><title type="html">Linus Norton</title><subtitle>Linus Norton, developer and tech lead based in London.</subtitle><entry><title type="html">Agentic Coding: Decentralisation of Software Development</title><link href="https://ljn.io//posts/agentic-coding-decentralisation-of-software-development" rel="alternate" type="text/html" title="Agentic Coding: Decentralisation of Software Development" /><published>2025-10-14T09:00:00+00:00</published><updated>2025-10-14T09:00:00+00:00</updated><id>https://ljn.io//posts/agentic-coding-decentralisation-of-software-development</id><content type="html" xml:base="https://ljn.io//posts/agentic-coding-decentralisation-of-software-development"><![CDATA[<p>Agentic coding marks a decisive shift in software development towards decentralisation and empowered teams across three layers: code, architecture, and team topology. As coding agents take on more responsibility, they transform not only how code is written but how systems are structured and how teams collaborate.</p>

<h2 id="1-code">1. Code</h2>

<p>At the code level, agentic coding replaces procedural control with intent-driven collaboration. Developers increasingly express goals, constraints, and patterns of reasoning, while autonomous coding agents interpret and act on these prompts.</p>

<p>As developers adapt to this new approach the focus increasingly becomes around writing concise specifications. Instead of working line-by-line, developers use specifications to orchestrate AI agents that:</p>

<ul>
  <li>Generate and refactor code according to localised patterns and style rules.</li>
  <li>Rely on inbuilt tooling and pipelines to enforce coding standards and preferences.</li>
  <li>Review implementations based on industry best practice for non-functional requirements (e.g security and performance).</li>
</ul>

<p>As agents become responsible for generating code and humans become responsible for writing the specification, the code becomes an artifact. The specifications, guardrails and tooling built into the repository are the inputs into the LLM which produces the code. Similar to the way a compiler produces machine code from source-code, albeit less deterministic.</p>

<p>Working with non-deterministic outputs from an LLM can be difficult, but using the specification it is possible to verify that the source-code generated meets the original requirements either through testing or using other LLMs for verification.</p>

<p>As generating code becomes “cheap”, the code becomes a disposable artifact that can easily be regenerated. That changes the balance of trade-offs that have long been discussed in the industry.</p>

<h3 id="frameworks-vs-libraries">Frameworks vs Libraries</h3>

<p>Discussion around using a library vs a framework goes back to as early as 2005 when Martin Fowler wrote in his post about <a href="https://martinfowler.com/bliki/InversionOfControl.html">Inversion of Control</a>:</p>

<blockquote>
  <p>“Inversion of Control is a key part of what makes a framework different to a library. A library is essentially a set of functions that you can call, these days usually organized into classes…</p>

  <p>A framework embodies some abstract design, with more behavior built in. In order to use it you need to insert your behavior into various places in the framework either by subclassing or by plugging in your own classes. The framework’s code then calls your code at these points.”</p>
</blockquote>

<p>Martin Fowler doesn’t express a preference for libraries or frameworks in his post but the debate quickly grew. David Heinemeier Hansson’s <a href="https://rubyonrails.org/doctrine">Ruby on Rails Doctrine</a> supporting frameworks and Adrian Holovaty of Django <a href="https://www.youtube.com/watch?v=VvOsegaN9Wk">cautioning against frameworks</a>.</p>

<p>Over time it’s become clear that there are trade-offs to both:</p>

<ul>
  <li><strong>Frameworks</strong> offer speed and ease of use but become restrictive and can quickly become a form of vendor lock in.</li>
  <li><strong>Libraries</strong> offer more power and flexibility but require more set up and wiring from the developer.</li>
</ul>

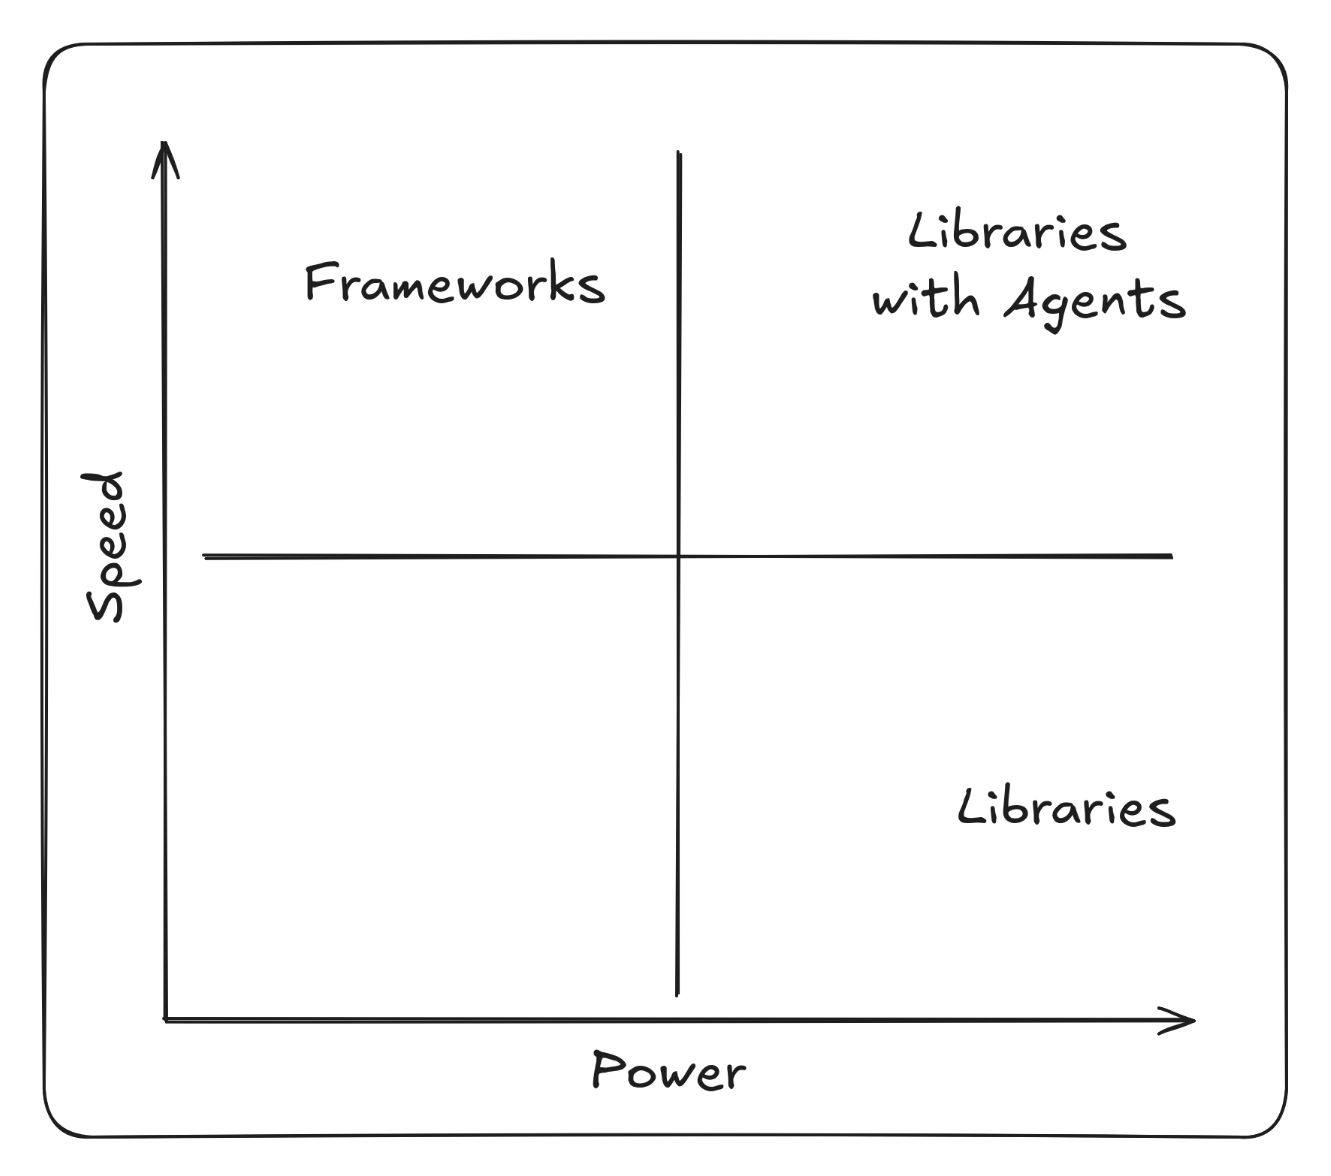
<p>This can also be framed as <strong>Speed vs Power</strong>.</p>

<p>Agentic coding changes this trade-off by increasing the speed of development when using libraries. The initial cost of set up when composing libraries is offset by using a coding agent to do the work. Given access to curated collections of libraries or components through an MCP server, agents can correctly assemble individual components efficiently.</p>

<p><img src="/asset/img/agentic-coding-decentralisation-of-software-development/agentic-decentralisation-1.png" alt="Frameworks vs Libraries with Agents" class="img-responsive" /></p>

<p>That’s not to say that agents don’t work well with frameworks, the strict guardrails often help, but they do not solve the fundamental downsides of a framework. Using agents with libraries allows you to have the power and flexibility libraries already bring, but the speed and ease of use that is typically associated with frameworks.</p>

<h2 id="2-architecture">2. Architecture</h2>

<p>Large organisations tend to follow one of two philosophies when designing their macro-architecture: Configuration Driven or Code Driven. The choice often comes down to how best to achieve re-use across different services in the organisation.</p>

<h3 id="configuration-driven-architecture">Configuration Driven Architecture</h3>

<p>The Configuration Driven (or Low Code) architectural approach opts for feature-rich centralised services that provide a lot of reusable functionality but require lots of configuration. The premise is that you can write the functionality that lots of services need in one place, allowing other services to re-use it by providing a configuration.</p>

<p>Over time Configuration Driven Architecture often falls prey to the <a href="https://en.wikipedia.org/wiki/Inner-platform_effect">Inner-platform effect</a> where the configuration becomes increasingly complex in order to support all the requirements of the users as the system evolves.</p>

<p>There are parallels between Configuration Driven Architecture and frameworks. Configuration can allow you to move quickly if you paint within the lines, but it quickly becomes difficult if you want to paint outside them.</p>

<p>The complexity of the configuration quickly grows as the system matures and custom DSLs or configuration languages often become necessary. You then face a form of vendor lock-in where developers are forced to learn organisation specific tooling, rather than industry-wide programming languages and libraries.</p>

<h3 id="code-driven-architecture">Code Driven Architecture</h3>

<p>Code Driven Architecture is a more engineering led approach where there are centralised services but as with using libraries, the services are just reusable functionality to be called upon by consuming services via API call. The set up and orchestration are done by the consumer, which comes at a cost but also allows a greater degree of flexibility and autonomy.</p>

<p>As Martin Fowler’s 2014 page on <a href="https://martinfowler.com/articles/microservices.html">Microservices</a> states that “The microservice community favours an alternative approach: smart endpoints and dumb pipe”, similarly, Sam Newman’s book <a href="https://samnewman.io/books/building_microservices_2nd_edition/">Building Microservices</a> warns against heavily centralised architectures: “Avoid approaches like enterprise service bus or orchestration systems, which can lead to centralization of business logic”.</p>

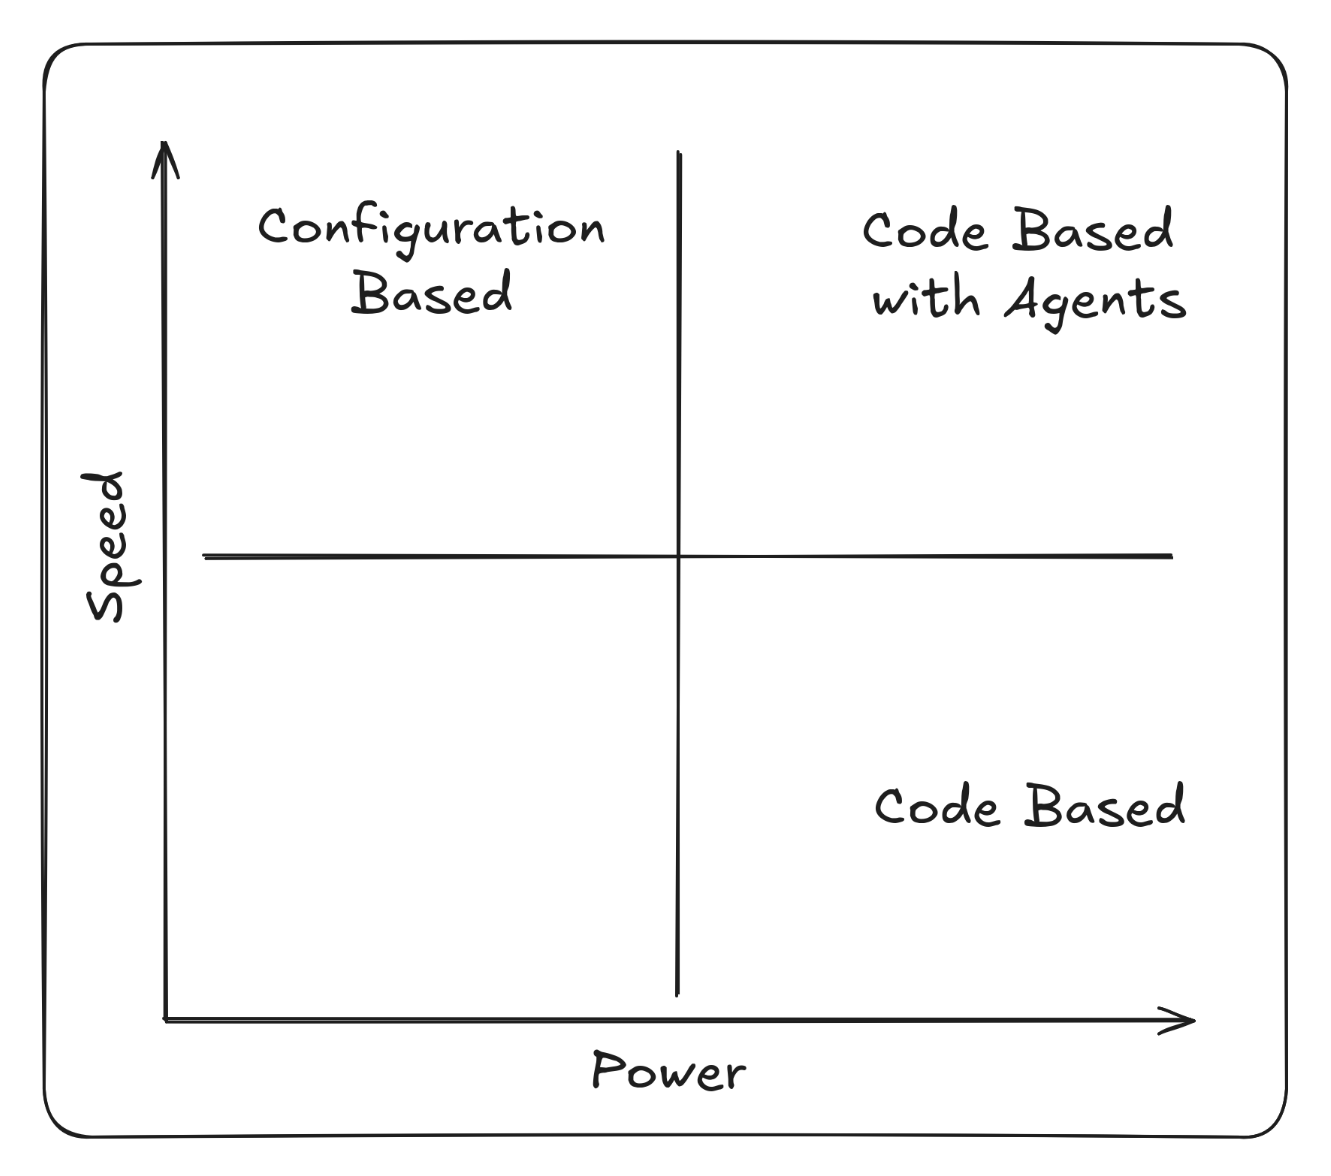
<p>As with libraries and frameworks, the trade-off is <strong>Speed vs Power</strong>. Configuration Driven Architecture promising speed and Code Driven Architecture power and flexibility.</p>

<p>Using agentic coding we can again adjust that trade-off. Teams are able to quickly compose reusable pieces of architecture in a way that works for them and mitigate the high set up cost without the constraints of a custom DSL or configuration language.</p>

<p>Common patterns and approaches from across the organisation can be distilled into <code class="language-plaintext highlighter-rouge">AGENTS.md</code> guidance, centralised prompt libraries or even dedicated sub-agents to call upon, all making it easier for the agent to build services in a way that is compatible with the ecosystem it is living in. Artifacts like ADRs stored in other codebases are invaluable resources to help agents understand the historical decision making that has led to the organisation’s current approach.</p>

<p>So instead of large, centralised orchestration layers, intelligence moves closer to the edge:</p>

<ul>
  <li>Systems are composed of smaller, self-sufficient services that encapsulate their own decision-making and processing logic.</li>
  <li>Configuration-heavy or low-code abstractions give way to clear, composable components that can evolve independently.</li>
  <li>Shared libraries and infrastructure still provide coherence, but not command. They serve as enablers, not bottlenecks.</li>
</ul>

<p>This decentralisation empowers individual service teams to innovate rapidly without waiting on central gatekeepers. Architecture becomes a distributed ecosystem where composability replaces centralisation, and agility replaces dependency.</p>

<p><img src="/asset/img/agentic-coding-decentralisation-of-software-development/agentic-decentralisation-2.png" alt="Configuration Based vs Code Based with Agents" class="img-responsive" /></p>

<h2 id="3-team-topology">3. Team Topology</h2>

<p>Centralising functionality behind configuration based services comes with another drawback: the teams that run the centralised services quickly become a bottleneck, as the aggregates all of the demand for new features from every one of their consumers.</p>

<p>Martin Skelton and Manuel Pais’ book <a href="https://www.amazon.co.uk/Team-Topologies-Organizing-Business-Technology/dp/1942788819">Team Topologies</a> outlines the problems in terms of value-stream alignment. If the delivery teams are not empowered to deliver value for their users or stakeholders, their requirements are pushed on to the team that can deliver it. This results in complex cross-team coordination for developing and releasing functionality.</p>

<p>In essence, it’s important not to confuse the technical platform that developers use to build their solution with the solution itself. As Martin and Manuel state:</p>

<blockquote>
  <p>“The most important part of the platform is that it is built for developers.”</p>
</blockquote>

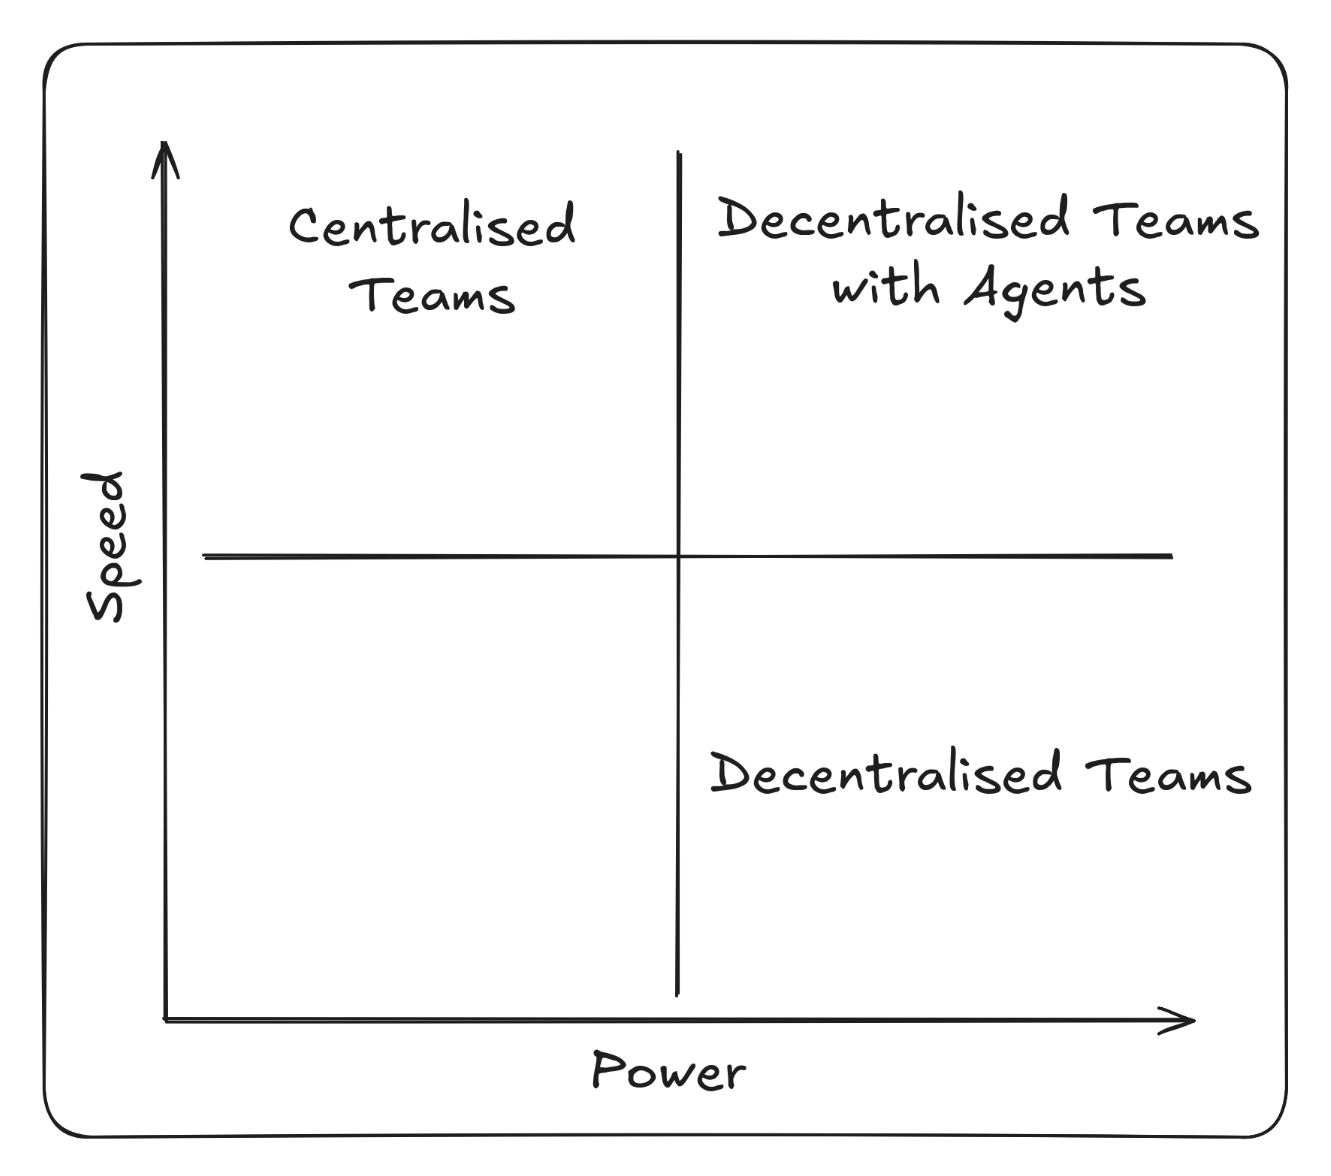
<p>Agentic coding reshapes team topology from centralised delivery functions into value-stream-aligned teams where value is delivered “at the edge”. No longer dependent on a central platform or integration groups to deliver functionality, teams own the full lifecycle of their services.</p>

<ul>
  <li>Teams align around products or domains rather than technical specialisms.</li>
  <li>Dependencies on centralised delivery teams are reduced as teams become more autonomous.</li>
  <li>Engineers operate within cross-functional squads that combine development, testing, and deployment capabilities, supported—not controlled—by platform services.</li>
</ul>

<p>This value-stream alignment mirrors the autonomy seen in the code and architecture layers. Teams become self-contained, adaptive units capable of shaping their own pipelines and responding directly to user needs.</p>

<p><img src="/asset/img/agentic-coding-decentralisation-of-software-development/agentic-decentralisation-3.png" alt="Centralised Teams vs Decentralised Teams with Agents" class="img-responsive" /></p>

<p>Ultimately <a href="https://en.wikipedia.org/wiki/Conway%27s_law">Conway’s Law</a> takes effect and the organisation decentralises to the same degree as its software.</p>

<h2 id="the-emerging-pattern-empowerment-through-decentralisation">The Emerging Pattern: Empowerment Through Decentralisation</h2>

<p>The common thread through all these layers is decentralisation and empowerment “at the edge”. As agentic coding is introduced at the very bottom of the stack, the ramifications rise to the top. Developers and development teams become more empowered to deliver functionality unencumbered by centralised systems holding them back, and they do it with the speed and ease of use typically offered by the centralised systems.</p>

<p>The rise of agentic coding (or vibe coding) has generated lots of debate within the industry and opinion is split on whether it’s a net negative or positive. Proponents argue that there are massive productivity gains when using agentic coding, but opponents argue that there are risks around security, code quality and governance. What both sides agree on is that agents can generate a lot of code, and they can do it quickly.</p>

<p>As the industry matures it’s becoming clearer that the risks can be mitigated with appropriate guardrails and tooling. It takes time to distill and embed the organisational knowledge, practices and engineering standards but doing so not only makes developers more productive, but also allows organisations to move from centralised control to empowered, autonomous teams.</p>]]></content><author><name></name></author><summary type="html"><![CDATA[Agentic coding marks a decisive shift in software development towards decentralisation and empowered teams across three layers: code, architecture, and team topology.]]></summary></entry><entry><title type="html">When size matters: the day a rogue getter swallowed our case data</title><link href="https://ljn.io//posts/when-size-matters" rel="alternate" type="text/html" title="When size matters: the day a rogue getter swallowed our case data" /><published>2025-06-04T02:00:00+00:00</published><updated>2025-06-04T02:00:00+00:00</updated><id>https://ljn.io//posts/when-size-matters</id><content type="html" xml:base="https://ljn.io//posts/when-size-matters"><![CDATA[<h2 id="where-are-my-case-notes">Where are my case notes?</h2>

<p>HMCTS, the courts and tribunals service within the Ministry of Justice, handles millions of Civil, Family and Tribunal cases each year. All of those cases flow through a case management system called <strong>CCD</strong>. CCD has its quirks - it’s configured via Excel spreadsheet and it implements business logic through an intricate system of callbacks into each team’s APIs - but most of the time it just works.  Every now and then, though, case data goes missing, which leads to… distress.</p>

<p>I was working on one of the smaller services at HMCTS where an issue was reported on a case. After triggering an event, most of the case data simply vanished. Not <em>all</em> of it (that would have been too easy); specifically the caseworker’s notes on the case had gone missing.</p>

<p>The audit trail showed nothing sinister: CCD’s callback came in, our Spring Boot service answered <code class="language-plaintext highlighter-rouge">200 OK</code>, and everybody went back to work… until someone opened the case and found most of the data was missing.</p>

<h2 id="the-only-clue-a-lonely-warning">The only clue: a lonely warning</h2>

<p>Buried in the logs there was a single line:</p>

<div class="language-plaintext highlighter-rouge"><div class="highlight"><pre class="highlight"><code>Response already committed. Ignoring: org.springframework.http.converter.HttpMessageNotWritableException
</code></pre></div></div>

<p>That warning was our only breadcrumb. No stack-trace, no 500, no “request failed” banner on CCD - just a shrug from Spring saying <em>too late, the headers are out the door</em>.</p>

<h2 id="a-getter-with-a-secret">A getter with a secret</h2>

<p>With a debugger hooked into the callback we discovered the culprit: during the Jackson serialization a <strong>getter</strong> sometimes threw a <code class="language-plaintext highlighter-rouge">NullPointerException</code>. You would assume that throwing an exception during serialization would raise a <code class="language-plaintext highlighter-rouge">500</code>, but clearly this wasn’t happening. We took a closer look at how Spring handles exceptions to find our log message:</p>

<div class="language-java highlighter-rouge"><div class="highlight"><pre class="highlight"><code><span class="k">if</span> <span class="o">(</span><span class="n">request</span> <span class="k">instanceof</span> <span class="nc">ServletWebRequest</span> <span class="n">servletWebRequest</span><span class="o">)</span> <span class="o">{</span>
    <span class="nc">HttpServletResponse</span> <span class="n">response</span> <span class="o">=</span> <span class="n">servletWebRequest</span><span class="o">.</span><span class="na">getResponse</span><span class="o">();</span>
    <span class="k">if</span> <span class="o">(</span><span class="n">response</span> <span class="o">!=</span> <span class="kc">null</span> <span class="o">&amp;&amp;</span> <span class="n">response</span><span class="o">.</span><span class="na">isCommitted</span><span class="o">())</span> <span class="o">{</span>
        <span class="n">logger</span><span class="o">.</span><span class="na">warn</span><span class="o">(</span><span class="s">"Response already committed. Ignoring: "</span> <span class="o">+</span> <span class="n">ex</span><span class="o">);</span>
        <span class="k">return</span> <span class="kc">null</span><span class="o">;</span>
    <span class="o">}</span>
<span class="o">}</span>
<span class="k">return</span> <span class="nf">createResponseEntity</span><span class="o">(</span><span class="n">body</span><span class="o">,</span> <span class="n">headers</span><span class="o">,</span> <span class="n">statusCode</span><span class="o">,</span> <span class="n">request</span><span class="o">);</span>
</code></pre></div></div>

<p>For context, HTTP responses happen in two parts: first the status and headers are sent, then the body starts streaming. Tomcat keeps those headers in an internal buffer until it fills up or you explicitly flush. When that happens the response is marked <strong>committed</strong> (<code class="language-plaintext highlighter-rouge">HttpServletResponse#isCommitted()</code> returns <code class="language-plaintext highlighter-rouge">true</code>). Before that moment Spring can still change its mind and turn the call into a 500 error; after it, the status code is already on the wire and cannot be rewritten.</p>

<p>So in our world:</p>

<ul>
  <li>If Jackson explodes <strong>before</strong> the headers are committed, Spring’s error handler tears down the partial response and returns a clean <code class="language-plaintext highlighter-rouge">500 Internal Server Error</code>.</li>
  <li>If the exception happens <strong>after</strong> the commit, Spring can no longer touch the status code. All it can do is log <em>“response already committed”</em> and keep streaming - which leaves the client holding a valid but half‑filled JSON document.</li>
</ul>

<h2 id="re-creating-the-issue">Re-creating the issue</h2>

<p>At first we couldn’t reproduce the bug locally; every attempt gave the expected 500. The breakthrough came when we realised <strong>two things mattered</strong>:</p>

<ol>
  <li><strong>Size</strong> - the JSON had to be big enough to flush the buffer early.</li>
  <li><strong>Order</strong> - the “big” field had to appear <em>before</em> the naughty getter.</li>
</ol>

<p>So we inflated an innocent field (in our case the <code class="language-plaintext highlighter-rouge">applicantName</code>) until the payload passed the buffer threshold. Now the exception triggered <em>after</em> the response was committed, and boom - we hit the same “data-eating” path Spring had taken in prod.</p>

<p>CCD received a perfectly valid but <strong>truncated</strong> document. Fields up to, but not beyond, the failing getter survived; everything else evaporated.</p>

<h2 id="why-the-json-stayed-valid">Why the JSON stayed valid</h2>

<p>Jackson streams objects field-by-field. When the getter exploded, the serializer simply <strong>abandoned</strong> the remaining properties but still wrote the closing braces it had already buffered. The result was syntactically correct JSON - just missing half its content. Because the transport never broke, CCD had no reason to reject it.</p>

<h2 id="takeaways">Takeaways</h2>

<ol>
  <li><strong>Never put real logic in a getter.</strong> Jackson will call it during serialisation; if it can throw, it <em>will</em> someday.</li>
  <li><strong>Buffer thresholds matter.</strong> A 5 kB object and a 50 kB object can follow completely different exception paths.</li>
  <li><strong>Monitor warnings, not just errors.</strong> When Spring says “response already committed” it’s really saying <em>“I gave up”</em>.</li>
</ol>

<p>We’ve patched the offending getter, cleaned up our DTOs, and set up an App Insights alert for that warning so the next silent 200 won’t slip through the cracks.</p>]]></content><author><name></name></author><summary type="html"><![CDATA[Silent 200s, missing JSON: the tale of a rogue getter, early-flushed headers, and how HTTP buffering let Spring return a valid but half-empty response.]]></summary></entry><entry><title type="html">Adding interchange time to the Connection Scan Algorithm</title><link href="https://ljn.io//posts/connection-scan-algorithm-with-interchange-time" rel="alternate" type="text/html" title="Adding interchange time to the Connection Scan Algorithm" /><published>2020-06-24T02:00:00+00:00</published><updated>2020-06-24T02:00:00+00:00</updated><id>https://ljn.io//posts/connection-scan-algorithm-with-interchange-time</id><content type="html" xml:base="https://ljn.io//posts/connection-scan-algorithm-with-interchange-time"><![CDATA[<p class="article-headline">The application of interchange (or transfer) time is often ignored in many journey planning algorithm’s. The original <a href="https://i11www.iti.kit.edu/extra/publications/dpsw-isftr-13.pdf">paper describing the Connection Scan Algorithm</a> does have a section describing the application of minimum transfer time by modifying the check to see if a connection is reachable. The <a href="https://arxiv.org/pdf/1703.05997.pdf">2017 paper</a> offers an alternative approach that uses footpaths to connect station platforms. However, both approaches come with their own problems.</p>

<h2 id="csa-refresher">CSA refresher</h2>

<p>The connection scan algorithm has been covered on this blog <a href="https://ljn.io/posts/so-you-want-to-build-a-journey-planner">before</a> and there is a <a href="https://github.com/planarnetwork/connection-scan-algorithm">reference implementation available on github</a>.</p>

<p>In essence, trips are broken down into connections between stops A and B and given a departure and arrival time. Footpaths are created as a pseudo-connection between A and B with a duration.</p>

<p>The list of connections is sorted by arrival time and then iterated a single time. Each connection is tested to see if it is reachable, and if it is it is tested again to see if it improves the arrival time at it’s destination. If it does improve the arrival time at it’s destination the earliest arrival time at that stop is updated and the connection is set as the “best” connection to get to that stop:</p>

<script src="https://gist.github.com/f3280c42a84283b5edc6c6a1fc3ad58b.js"> </script>

<p>Without the application of interchange time the implementation of <code class="language-plaintext highlighter-rouge">isReachable</code> and <code class="language-plaintext highlighter-rouge">isBetter</code> is:</p>

<script src="https://gist.github.com/82007c0d5991f626e6184308b28ead1c.js"> </script>

<h2 id="original-implementation">Original implementation</h2>

<p>The original paper updates the <code class="language-plaintext highlighter-rouge">isReachable</code> function to detect whether interchange time is required and check for it if necessary:</p>

<script src="https://gist.github.com/9da8bbd7cc7a52f34ce124ce4bcd6f98.js"> </script>

<p>While this change appears to be simple, it introduces an edge case that results in sub-optimal journeys being created.</p>

<p>Given two trips, Trip 1 and Trip 2, running in parallel along stops A, B, C and D. Trip 1 arrives earliest at A, B and C and Trip 2 arrives
earliest at D:</p>

<div class="language-plaintext highlighter-rouge"><div class="highlight"><pre class="highlight"><code>Trip 1:
  A -&gt; B, 1000, 1010
  B -&gt; C, 1010, 1020
  C -&gt; D, 1020, 1040

Trip 2:
  A -&gt; B, 1005, 1015
  B -&gt; C, 1015, 1025
  C -&gt; D, 1025, 1035

</code></pre></div></div>

<p>If the interchange time at stop C is greater than 5 it makes it impossible to change from Trip 1 to Trip 2 to get the earliest arrival time at stop D.</p>

<p>The crux of the issue is that the algorithm assumes that using the best arrival time at A, B and C will result in the best arrival time at D. Applying interchange time breaks this assumption. In this case, how you arrive at stop C is important.</p>

<h2 id="updated-implementation">Updated implementation</h2>

<p>In the 2017 paper, interchange time is applied using footpaths. A footpath is added between each platform within the station and the interchange time between those platforms is used as the duration of the connection. If platform information is available</p>

<p>This approach gives a much more granular level of interchange time, and removes to modify the <code class="language-plaintext highlighter-rouge">isReachable</code> check, but it does require platform information to be available ahead of time. In the UK it is quite common for platforms to change at short notice which could result in unrealistic journeys being suggested.</p>

<p>The edge case from the original application of interchange still applies. Storing the best result for stops A, B and C means that the earliest arrival at D is unobtainable.</p>

<h2 id="an-alternative">An alternative</h2>

<p>The connection algorithm stores its results in two indexes, one with the earliest arrival time at each stop and the other with the connection that got there. To avoid the issue with interchange time its possible to modify the <code class="language-plaintext highlighter-rouge">isReachable</code> method so that it first checks whether the connection is reachable with interchange time, and if not, it checks whether it was possible to board to the connections trip at an earlier point. For this an index of boardable trips needs to be maintained:</p>

<script src="https://gist.github.com/cce2df9db1b223c46ddccb0cbea477e2.js"> </script>

<p>While this does fix the issue highlighted above, it comes with a drawback. The best connection to get to D is now set to the Trip 2 C-&gt;D connection, but the best connection to get to C is still Trip 1 B-&gt;C and it is not possible to change between them at C. Luckily some fixes I have <a href="https://ljn.io/posts/CSA-workarounds">previously outlined</a> will correct this as it eliminates redundant legs.</p>

<h2 id="takeaways">Takeaways</h2>

<p>Interchange time is a messy real-world problem that isn’t always accounted for in algorithm papers, and even when it is, it is difficult to do comprehensively. The Connection Scan Algorithm is admirable for being simple and fast, but there are so many caveats and workarounds that need to be applied that it is usually best to stick to other algorithms such as Raptor or Transfer Patterns for anything mission critical.</p>]]></content><author><name></name></author><summary type="html"><![CDATA[Adding interchange (transfer) time to the Connection Scan Algorithm can have unintended consequences. This post discusses the approach taken in the original papers and another alternative approach.]]></summary></entry><entry><title type="html">Distributed queues with MySQL 8</title><link href="https://ljn.io//posts/distributed-queues-with-mysql" rel="alternate" type="text/html" title="Distributed queues with MySQL 8" /><published>2020-05-15T02:00:00+00:00</published><updated>2020-05-15T02:00:00+00:00</updated><id>https://ljn.io//posts/distributed-queues-with-mysql</id><content type="html" xml:base="https://ljn.io//posts/distributed-queues-with-mysql"><![CDATA[<p class="article-headline">Writing a distributed queue doesn’t have involve specialist software or writing reams of code. In this post we use MySQL to create a scalable distributed queue. All you will need is MySQL and two terminals.</p>

<h2 id="setup">Setup</h2>

<p>First of all, we need to create a table for job queue and add some jobs:</p>

<pre><code class="language-mysql">CREATE TABLE job (
  id INT(11) unsigned auto_increment PRIMARY KEY,
  state ENUM("NEW", "DONE")
);
INSERT INTO job VALUES
  (null, "NEW"),
  (null, "NEW"),
  (null, "NEW"),
  (null, "NEW"),
  (null, "NEW");
</code></pre>

<h2 id="locking">Locking</h2>

<p>In a distributed system with multiple instances of your application there is always the risk that two instances will attempt to take the same jobs from the queue. Luckily, almost all relational databases come with some form of locking built in. In MySQL’s case we can use <code class="language-plaintext highlighter-rouge">SELECT ... FOR UPDATE</code></p>

<p>Let’s simulate multiple instances of our application trying to pick up the jobs at the same time using multiple terminals.</p>

<p>Terminal 1:</p>

<pre><code class="language-mysql">SELECT * FROM job WHERE state = "NEW" LIMIT 1;
+----+-------+
| id | state |
+----+-------+
|  1 | NEW   |
+----+-------+
</code></pre>

<p>Terminal 2:</p>

<pre><code class="language-mysql">SELECT * FROM job WHERE state = "NEW" LIMIT 1;
+----+-------+
| id | state |
+----+-------+
|  1 | NEW   |
+----+-------+
</code></pre>

<p>As you would expect both instances have now started processing the same job. Not what we want.</p>

<p>However, using <code class="language-plaintext highlighter-rouge">SELECT ... FOR UPDATE</code> inside a transaction will lock the table until it’s been updated by the instance that locked it.</p>

<p>Terminal 1:</p>

<pre><code class="language-mysql">START TRANSACTION;
SELECT * FROM job WHERE state = "NEW" LIMIT 1 FOR UPDATE;
+----+-------+
| id | state |
+----+-------+
|  1 | NEW   |
+----+-------+
</code></pre>

<p>How switch over to Terminal 2 and try the same thing:</p>
<pre><code class="language-mysql">START TRANSACTION;
SELECT * FROM job WHERE state = "NEW" LIMIT 1 FOR UPDATE;
</code></pre>

<p>At this moment Terminal 2 is locked until Terminal 1 commits the transaction and the query will not return a result.</p>

<p>Terminal 1:</p>

<pre><code class="language-mysql">UPDATE job SET state = "DONE" WHERE id = 1;
COMMIT;
</code></pre>

<p>Now Terminal 2 has been unlocked and returns:</p>

<pre><code class="language-mysql">+----+-------+
| id | state |
+----+-------+
|  2 | NEW   |
+----+-------+
1 row in set (37.304 sec)
</code></pre>

<p>Not only did it wait for the lock to be free but it also waited for the update to be applied and selected the next job in the list.</p>

<h2 id="scaling">Scaling</h2>

<p>You may have noticed that this approach locked the whole table, meaning that only one instance can process jobs at a time. This is also not what we want.</p>

<p>Luckily, the second instance can ask MySQL to skip over any locked rows when it tries to select a job.</p>

<p>Lock a row in Terminal 1:</p>

<pre><code class="language-mysql">START TRANSACTION;
SELECT * FROM job WHERE state = "NEW" LIMIT 1 FOR UPDATE SKIP LOCKED;
+----+-------+
| id | state |
+----+-------+
|  2 | NEW   |
+----+-------+
</code></pre>

<p>And switch over to Terminal 2:</p>

<pre><code class="language-mysql">START TRANSACTION;
SELECT * FROM job WHERE state = "NEW" LIMIT 1 FOR UPDATE SKIP LOCKED;
+----+-------+
| id | state |
+----+-------+
|  3 | NEW   |
+----+-------+
</code></pre>

<p>And now our second instance selects the row that is not locked by the first instance. It’s now safe for each instance to start polling for jobs without fear of stepping on each others toes. You can add as many instances as you want to start processing jobs to horizontally scale your service.</p>

<p>Postgres 9.5 and MySQL 8.0 both have support for the <code class="language-plaintext highlighter-rouge">SKIP LOCKED</code> feature, unfortunately MariaDB does not currently support it.</p>

<p>There’s no doubt that queues can grow more complex with features like TTL and dead letter queues, but if you want something simple and don’t need all the bells and whistles of something like RabbitMQ then this approach should prove simple and scalable.</p>]]></content><author><name></name></author><summary type="html"><![CDATA[Writing a distributed queue doesn't have to involve specialist software or writing reams of code. In this post we use MySQL to create a scalable distributed queue.]]></summary></entry><entry><title type="html">Rotating database backups with node.js and S3</title><link href="https://ljn.io//posts/rotating-database-backups" rel="alternate" type="text/html" title="Rotating database backups with node.js and S3" /><published>2020-04-06T02:00:00+00:00</published><updated>2020-04-06T02:00:00+00:00</updated><id>https://ljn.io//posts/rotating-database-backups</id><content type="html" xml:base="https://ljn.io//posts/rotating-database-backups"><![CDATA[<p class="article-headline">RDS provides it’s own in built database backup system, but if you are not using RDS you can roll your own with a small node.js script and an S3 policy.</p>

<p>In this guide I’ll walk through setting up a database backup where hourly dumps are stored for a day, daily for a week, weekly for a month and monthly for a year.</p>

<h2 id="setup">Setup</h2>

<p>If you have an existing node project you can just add this script and some dependencies to it. If you don’t then set up a new project with <code class="language-plaintext highlighter-rouge">npm init</code>. Then add the AWS SDK and mysqldump libraries:</p>

<div class="language-plaintext highlighter-rouge"><div class="highlight"><pre class="highlight"><code>npm install --save mysqldump aws-sdk
</code></pre></div></div>

<h2 id="generating-the-mysql-dump">Generating the MySQL dump</h2>

<p>With the project set up we need a script to trigger the backup every hour. Create a file called <code class="language-plaintext highlighter-rouge">backup.js</code></p>

<div class="language-javascript highlighter-rouge"><div class="highlight"><pre class="highlight"><code>
<span class="k">async</span> <span class="kd">function</span> <span class="nx">backup</span><span class="p">()</span> <span class="p">{</span>
  <span class="kd">const</span> <span class="nx">now</span> <span class="o">=</span> <span class="k">new</span> <span class="nb">Date</span><span class="p">();</span>
  <span class="kd">const</span> <span class="nx">dateString</span> <span class="o">=</span> <span class="nx">now</span><span class="p">.</span><span class="nx">toJSON</span><span class="p">().</span><span class="nx">substring</span><span class="p">(</span><span class="mi">0</span><span class="p">,</span> <span class="mi">16</span><span class="p">).</span><span class="nx">replace</span><span class="p">(</span><span class="dl">"</span><span class="s2">:</span><span class="dl">"</span><span class="p">,</span> <span class="dl">""</span><span class="p">);</span>
  <span class="kd">const</span> <span class="nx">filename</span> <span class="o">=</span> <span class="s2">`db-</span><span class="p">${</span><span class="nx">dateString</span><span class="p">}</span><span class="s2">.sql.gz`</span><span class="p">;</span>
  <span class="kd">const</span> <span class="nx">path</span> <span class="o">=</span> <span class="dl">"</span><span class="s2">/tmp/</span><span class="dl">"</span> <span class="o">+</span> <span class="nx">filename</span><span class="p">;</span>

  <span class="k">await</span> <span class="nx">mysqldump</span><span class="p">({</span>
    <span class="na">connection</span><span class="p">:</span> <span class="p">{</span>
      <span class="na">user</span><span class="p">:</span> <span class="dl">"</span><span class="s2">root</span><span class="dl">"</span><span class="p">,</span>
      <span class="na">host</span><span class="p">:</span> <span class="dl">"</span><span class="s2">localhost</span><span class="dl">"</span><span class="p">,</span>
      <span class="na">password</span><span class="p">:</span> <span class="dl">""</span><span class="p">,</span>
      <span class="na">database</span><span class="p">:</span> <span class="dl">"</span><span class="s2">mydb</span><span class="dl">"</span>
    <span class="p">},</span>
    <span class="na">dumpToFile</span><span class="p">:</span> <span class="nx">path</span><span class="p">,</span>
    <span class="na">compressFile</span><span class="p">:</span> <span class="kc">true</span><span class="p">,</span>
  <span class="p">});</span>
<span class="p">}</span>

<span class="c1">// run the backup function every hour</span>
<span class="nx">setInterval</span><span class="p">(</span><span class="nx">backup</span><span class="p">,</span> <span class="mi">3600</span> <span class="o">*</span> <span class="mi">1000</span><span class="p">);</span>

</code></pre></div></div>

<p>Be sure to plug in the correct database credentials to the <code class="language-plaintext highlighter-rouge">mysqldump</code> call. One thing to note is that the library does not accept null passwords, but it does treat an empty string as null.</p>

<p>If you run the script with <code class="language-plaintext highlighter-rouge">node backup.js</code> a backup file will be created in the <code class="language-plaintext highlighter-rouge">/tmp</code> folder every hour.</p>

<h2 id="setting-up-an-s3-bucket">Setting up an S3 bucket</h2>

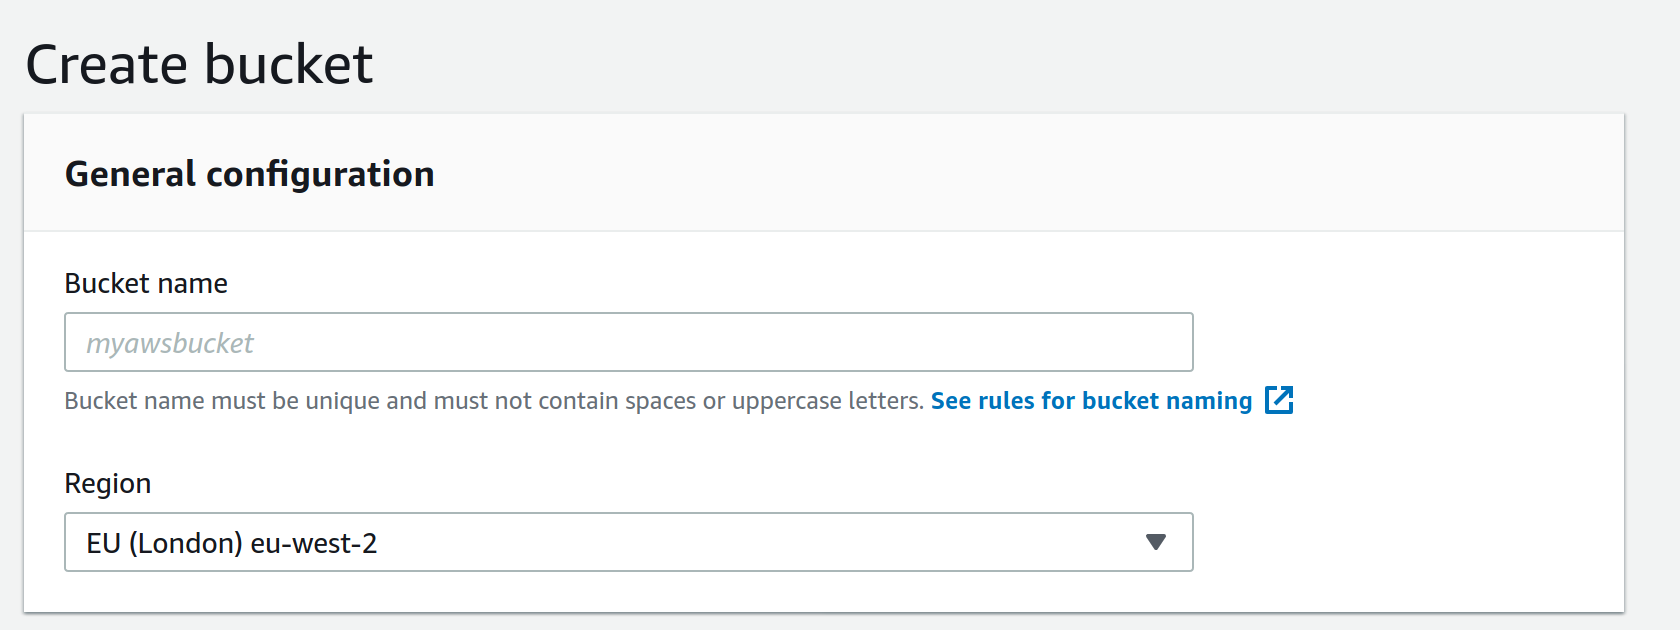
<p>Log in to your AWS console and navigate to S3. Select create a bucket:</p>

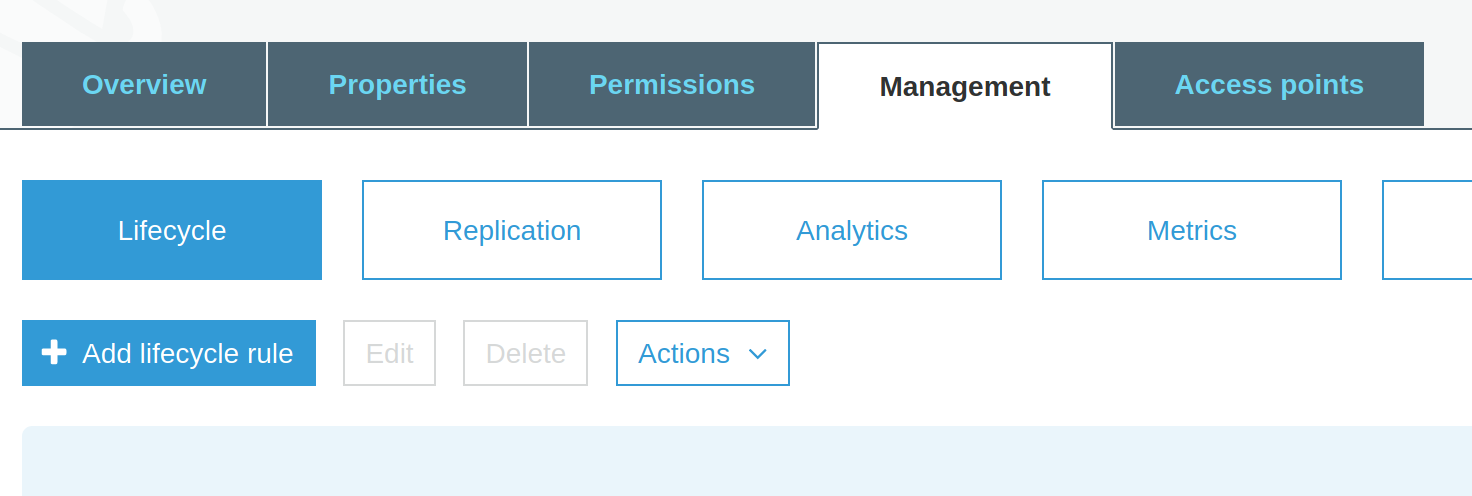
<p><img src="/asset/img/rotating-database-backup/create-bucket.png" alt="create-bucket" class="img-responsive" /></p>

<p>Make note of the name as it will be needed later.</p>

<p>Now we need to create the S3 lifecycle policy to remove the old backup files. Click on the bucket and go to the Management tab:</p>

<p><img src="/asset/img/rotating-database-backup/add-lifecycle.png" alt="add-lifecycle" class="img-responsive" /></p>

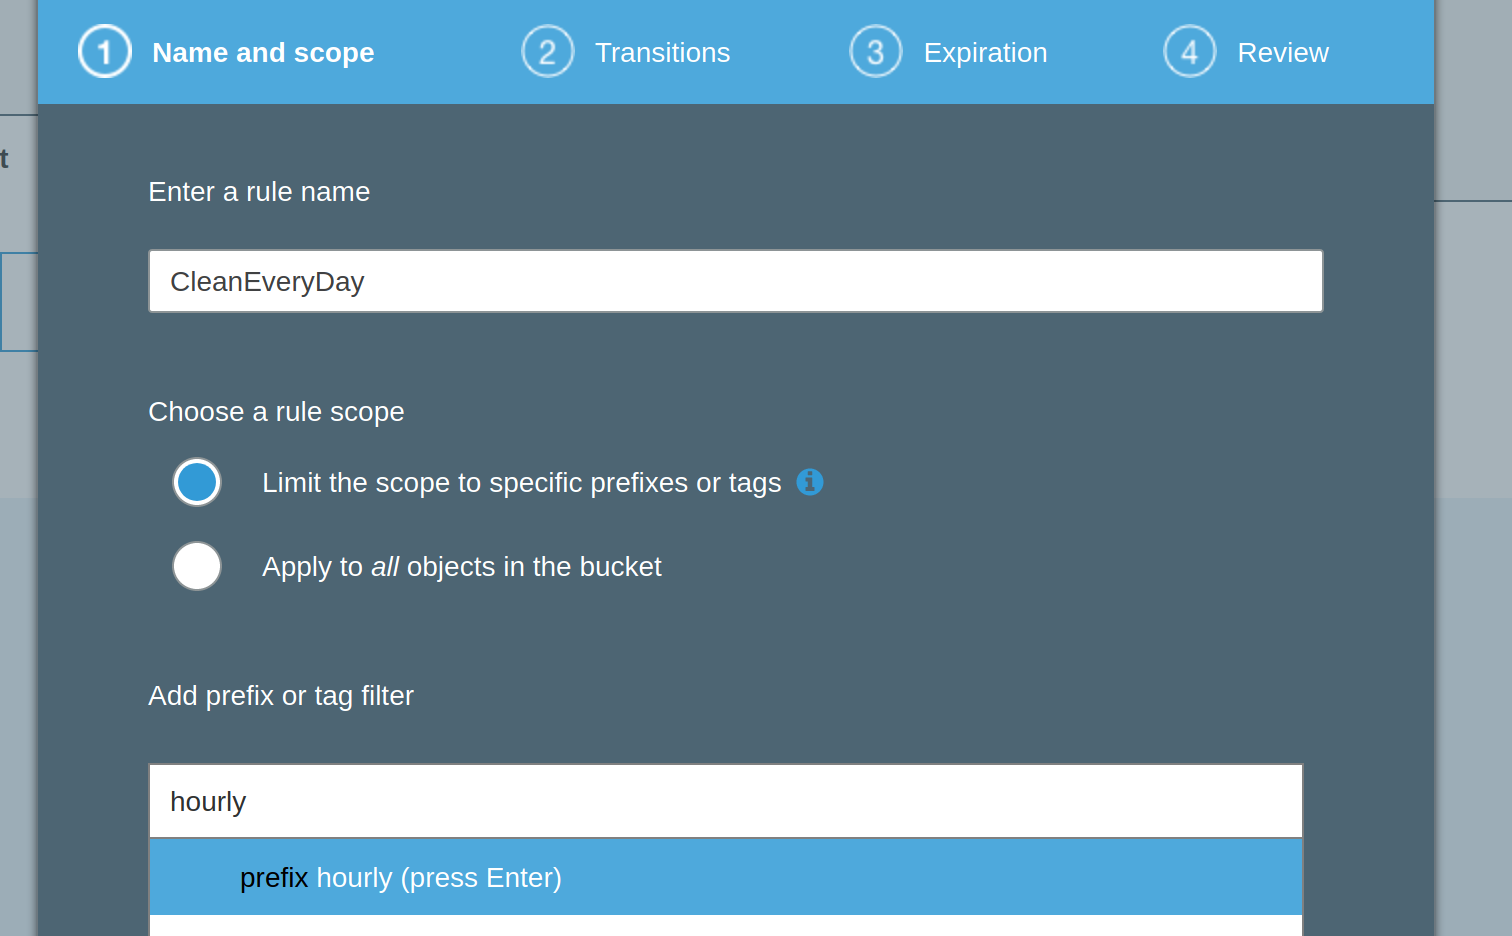
<p>Select add lifecycle and then enter the name RemoveDaily and apply it to the hourly/ folder</p>

<p><img src="/asset/img/rotating-database-backup/setup-lifecycle.png" alt="setup-lifecycle" class="img-responsive" /></p>

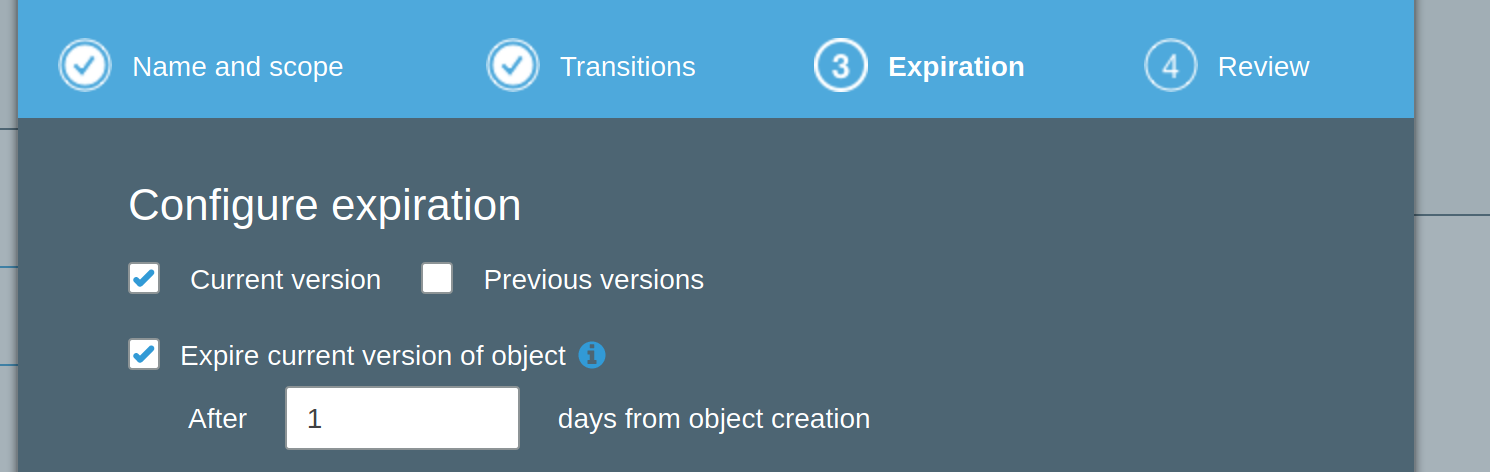
<p>Next, set the policy to expire files older than 1 day:</p>

<p><img src="/asset/img/rotating-database-backup/expire.png" alt="expire" class="img-responsive" /></p>

<p>Now repeat this process so that items in the daily folder expire after 7 days, weekly expire after 31 days and monthly expire after 365 days.</p>

<h2 id="uploading-to-s3">Uploading to S3</h2>

<p>Now the dumps are generated and the S3 bucket has been set up we can upload the dumps. You’ll also need to generate an API key to use with the AWS SDK. Typically these are stored as the environment variables: <code class="language-plaintext highlighter-rouge">AWS_ACCESS_KEY</code> and <code class="language-plaintext highlighter-rouge">AWS_SECRET_ACCESS_KEY</code>.</p>

<div class="language-javascript highlighter-rouge"><div class="highlight"><pre class="highlight"><code><span class="k">async</span> <span class="kd">function</span> <span class="nx">upload</span><span class="p">(</span><span class="nx">filename</span><span class="p">,</span> <span class="nx">path</span><span class="p">,</span> <span class="nx">date</span><span class="p">)</span> <span class="p">{</span>
  <span class="kd">const</span> <span class="nx">s3</span> <span class="o">=</span> <span class="k">new</span> <span class="nx">S3</span><span class="p">({</span>
    <span class="na">accessKeyId</span><span class="p">:</span> <span class="nx">process</span><span class="p">.</span><span class="nx">env</span><span class="p">.</span><span class="nx">AWS_ACCESS_KEY</span><span class="p">,</span>
    <span class="na">secretAccessKey</span><span class="p">:</span> <span class="nx">process</span><span class="p">.</span><span class="nx">env</span><span class="p">.</span><span class="nx">AWS_SECRET_ACCESS_KEY</span>
  <span class="p">});</span>

  <span class="kd">const</span> <span class="nx">s3directory</span> <span class="o">=</span> <span class="nx">getS3Directory</span><span class="p">(</span><span class="nx">date</span><span class="p">);</span>

  <span class="k">return</span> <span class="k">new</span> <span class="nb">Promise</span><span class="p">((</span><span class="nx">resolve</span><span class="p">,</span> <span class="nx">reject</span><span class="p">)</span> <span class="o">=&gt;</span> <span class="p">{</span>
    <span class="nx">s3</span><span class="p">.</span><span class="nx">upload</span><span class="p">({</span>
      <span class="na">Bucket</span><span class="p">:</span> <span class="dl">"</span><span class="s2">yourbucketnamehere</span><span class="dl">"</span><span class="p">,</span>
      <span class="na">Key</span><span class="p">:</span> <span class="nx">s3directory</span> <span class="o">+</span> <span class="nx">filename</span><span class="p">,</span>
      <span class="na">Body</span><span class="p">:</span> <span class="nx">fs</span><span class="p">.</span><span class="nx">createReadStream</span><span class="p">(</span><span class="nx">path</span><span class="p">),</span>
    <span class="p">},</span> <span class="p">(</span><span class="nx">err</span><span class="p">,</span> <span class="nx">res</span><span class="p">)</span> <span class="o">=&gt;</span> <span class="nx">err</span> <span class="p">?</span> <span class="nx">reject</span><span class="p">(</span><span class="nx">err</span><span class="p">)</span> <span class="p">:</span> <span class="nx">resolve</span><span class="p">());</span>
  <span class="p">});</span>
<span class="p">}</span>

<span class="kd">function</span> <span class="nx">getS3Directory</span><span class="p">(</span><span class="nx">date</span><span class="p">)</span> <span class="p">{</span>
  <span class="k">if</span> <span class="p">(</span><span class="nx">date</span><span class="p">.</span><span class="nx">getHours</span><span class="p">()</span> <span class="o">===</span> <span class="mi">0</span><span class="p">)</span> <span class="p">{</span>
    <span class="k">if</span> <span class="p">(</span><span class="nx">date</span><span class="p">.</span><span class="nx">getDate</span><span class="p">()</span> <span class="o">===</span> <span class="mi">1</span><span class="p">)</span> <span class="p">{</span>
      <span class="k">return</span> <span class="dl">"</span><span class="s2">monthly/</span><span class="dl">"</span><span class="p">;</span>
    <span class="p">}</span>

    <span class="k">if</span> <span class="p">(</span><span class="nx">date</span><span class="p">.</span><span class="nx">getDay</span><span class="p">()</span> <span class="o">===</span> <span class="mi">1</span><span class="p">)</span> <span class="p">{</span>
      <span class="k">return</span> <span class="dl">"</span><span class="s2">weekly/</span><span class="dl">"</span><span class="p">;</span>
    <span class="p">}</span>

    <span class="k">return</span> <span class="dl">"</span><span class="s2">daily/</span><span class="dl">"</span><span class="p">;</span>
  <span class="p">}</span>

  <span class="k">return</span> <span class="dl">"</span><span class="s2">hourly/</span><span class="dl">"</span><span class="p">;</span>
<span class="p">}</span>
</code></pre></div></div>

<p>The <code class="language-plaintext highlighter-rouge">getS3Directory</code> function will categorize the current backup by classing it as “monthly”, “weekly”, “daily” or “hourly” depending on the date given.</p>

<p>Now we just need to update our backup function so that it uploads the file and then deletes it afterwards:</p>

<div class="language-javascript highlighter-rouge"><div class="highlight"><pre class="highlight"><code><span class="k">async</span> <span class="kd">function</span> <span class="nx">backup</span><span class="p">()</span> <span class="p">{</span>
  <span class="kd">const</span> <span class="nx">now</span> <span class="o">=</span> <span class="k">new</span> <span class="nb">Date</span><span class="p">();</span>
  <span class="kd">const</span> <span class="nx">dateString</span> <span class="o">=</span> <span class="nx">now</span><span class="p">.</span><span class="nx">toJSON</span><span class="p">().</span><span class="nx">substring</span><span class="p">(</span><span class="mi">0</span><span class="p">,</span> <span class="mi">16</span><span class="p">).</span><span class="nx">replace</span><span class="p">(</span><span class="dl">"</span><span class="s2">:</span><span class="dl">"</span><span class="p">,</span> <span class="dl">""</span><span class="p">);</span>
  <span class="kd">const</span> <span class="nx">filename</span> <span class="o">=</span> <span class="s2">`db-</span><span class="p">${</span><span class="nx">dateString</span><span class="p">}</span><span class="s2">.sql.gz`</span><span class="p">;</span>
  <span class="kd">const</span> <span class="nx">path</span> <span class="o">=</span> <span class="dl">"</span><span class="s2">/tmp/</span><span class="dl">"</span> <span class="o">+</span> <span class="nx">filename</span><span class="p">;</span>

  <span class="k">await</span> <span class="nx">mysqldump</span><span class="p">({</span>
    <span class="na">connection</span><span class="p">:</span> <span class="p">{</span>
      <span class="na">user</span><span class="p">:</span> <span class="dl">"</span><span class="s2">root</span><span class="dl">"</span><span class="p">,</span>
      <span class="na">host</span><span class="p">:</span> <span class="dl">"</span><span class="s2">localhost</span><span class="dl">"</span><span class="p">,</span>
      <span class="na">password</span><span class="p">:</span> <span class="dl">""</span><span class="p">,</span>
      <span class="na">database</span><span class="p">:</span> <span class="dl">"</span><span class="s2">mydb</span><span class="dl">"</span>
    <span class="p">},</span>
    <span class="na">dumpToFile</span><span class="p">:</span> <span class="nx">path</span><span class="p">,</span>
    <span class="na">compressFile</span><span class="p">:</span> <span class="kc">true</span><span class="p">,</span>
  <span class="p">});</span>    

  <span class="k">await</span> <span class="nx">upload</span><span class="p">(</span><span class="nx">filename</span><span class="p">,</span> <span class="nx">path</span><span class="p">,</span> <span class="nx">now</span><span class="p">);</span>

  <span class="nx">fs</span><span class="p">.</span><span class="nx">unlink</span><span class="p">(</span><span class="nx">path</span><span class="p">,</span> <span class="p">()</span> <span class="o">=&gt;</span> <span class="p">{});</span>
<span class="p">}</span>
</code></pre></div></div>

<p>Now when you run <code class="language-plaintext highlighter-rouge">node backup.js</code> it will take a dump of the database every hour and upload it to your S3 bucket.</p>

<p>One thing to note about the S3 policy is that it is only executed once a day, which means your hourly backups won’t expire exactly when they a supposed to but they won’t be more than 24 hours out, and it never hurts to have an extra hourly backups lying around.</p>]]></content><author><name></name></author><summary type="html"><![CDATA[Use node.js to store MySQL dumps in S3]]></summary></entry><entry><title type="html">Publishing Cucumber reports using Travis and GitHub pages</title><link href="https://ljn.io//posts/publishing-cucumber-reports-with-travis" rel="alternate" type="text/html" title="Publishing Cucumber reports using Travis and GitHub pages" /><published>2020-03-12T02:00:00+00:00</published><updated>2020-03-12T02:00:00+00:00</updated><id>https://ljn.io//posts/publishing-cucumber-reports-with-travis</id><content type="html" xml:base="https://ljn.io//posts/publishing-cucumber-reports-with-travis"><![CDATA[<p class="article-headline">Recently I’ve been working on an automated testing framework for journey planners and ticketing systems. My tests are written in Cucumber and I wanted to find a way to automatically publish the test report to a website. With Travis CI and GitHub this is remarkably easy.</p>

<h1 id="generating-the-reports">Generating the reports</h1>

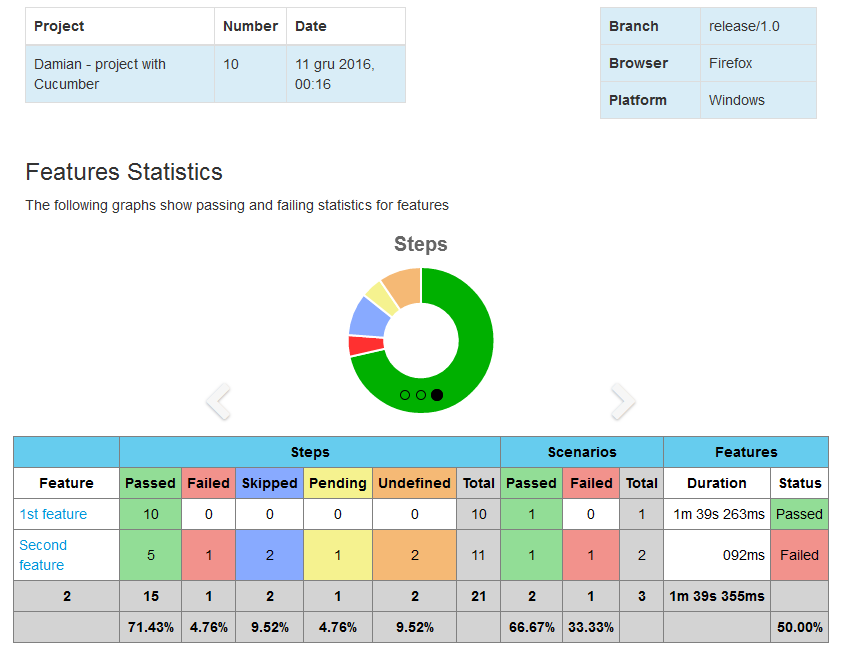
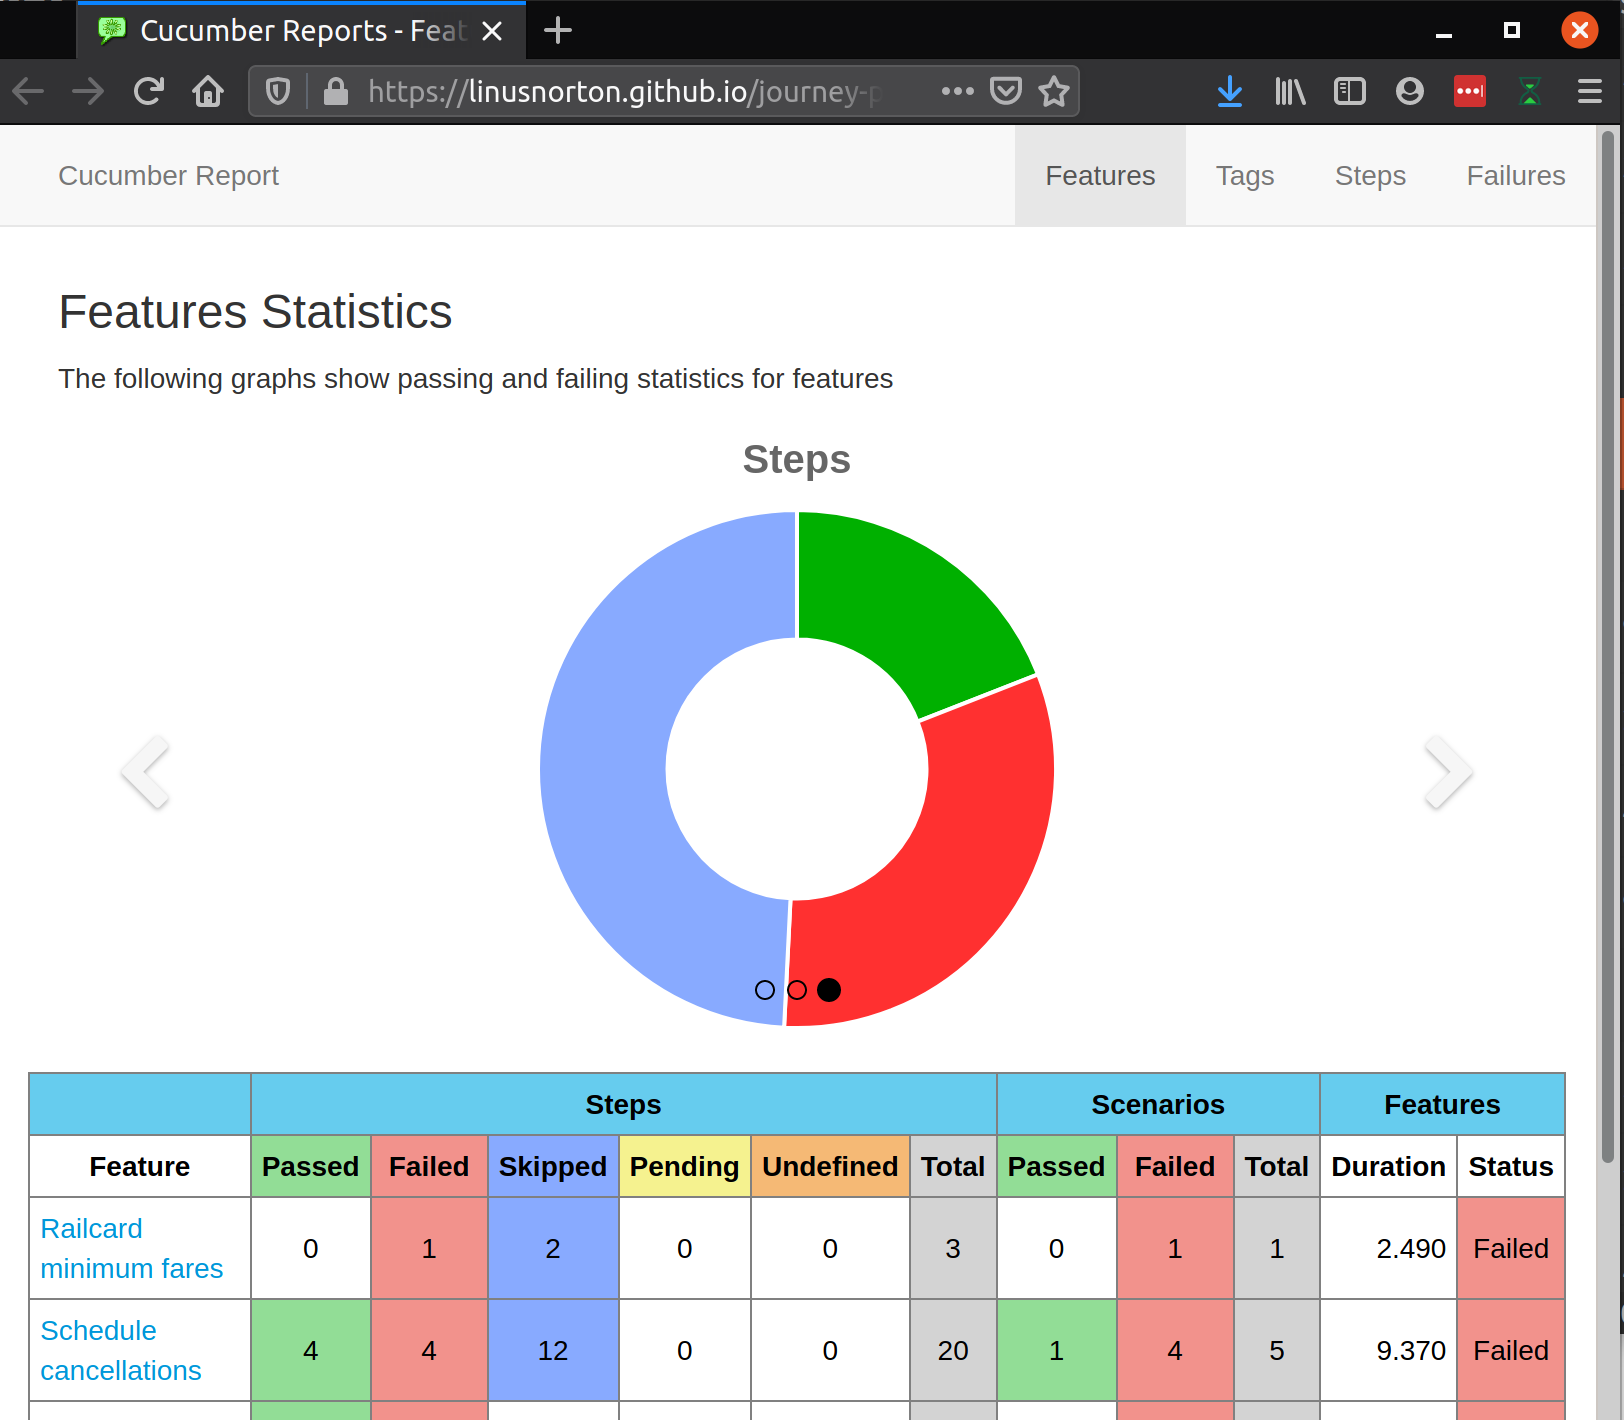
<p>Before getting started, I would highly recommend using <a href="https://github.com/damianszczepanik/cucumber-reporting">Damian Szczepanik’s cucumber reports</a> as they are much more legible than the default HTML reports:</p>

<p><img src="/asset/img/publishing-cucumber-reports-with-travis/feature-overview.png" alt="cucumber-reports" class="img-responsive" /></p>

<p>There is a handy <a href="https://www.jvt.me/posts/2019/04/07/prettier-cucumber-jvm-html-reports/">guide</a> on how to them up, but the short version is to add the dependency and configure your test runner to use the plugin:</p>

<div class="language-groovy highlighter-rouge"><div class="highlight"><pre class="highlight"><code>
<span class="n">dependencies</span> <span class="o">{</span>
    <span class="c1">// ... other dependencies omitted</span>
    <span class="n">testImplementation</span><span class="o">(</span><span class="s2">"io.cucumber:cucumber-java:5.1.3"</span><span class="o">)</span>
    <span class="n">testImplementation</span><span class="o">(</span><span class="s2">"io.cucumber:cucumber-junit:5.1.3"</span><span class="o">)</span>
    <span class="n">testImplementation</span><span class="o">(</span><span class="s2">"de.monochromata.cucumber:reporting-plugin:4.0.29"</span><span class="o">)</span>
<span class="o">}</span>

<span class="n">configurations</span> <span class="o">{</span>
    <span class="n">cucumberRuntime</span> <span class="o">{</span>
        <span class="n">extendsFrom</span> <span class="n">testImplementation</span>
    <span class="o">}</span>
<span class="o">}</span>

<span class="n">task</span> <span class="nf">cucumber</span><span class="o">()</span> <span class="o">{</span>
    <span class="n">dependsOn</span> <span class="n">assemble</span><span class="o">,</span> <span class="n">compileJava</span>
    <span class="n">doLast</span> <span class="o">{</span>
        <span class="n">javaexec</span> <span class="o">{</span>
            <span class="n">main</span> <span class="o">=</span> <span class="s2">"io.cucumber.core.cli.Main"</span>
            <span class="n">classpath</span> <span class="o">=</span> <span class="n">configurations</span><span class="o">.</span><span class="na">cucumberRuntime</span> <span class="o">+</span> <span class="n">sourceSets</span><span class="o">.</span><span class="na">main</span><span class="o">.</span><span class="na">output</span> <span class="o">+</span> <span class="n">sourceSets</span><span class="o">.</span><span class="na">test</span><span class="o">.</span><span class="na">output</span>
            <span class="n">args</span> <span class="o">=</span> <span class="o">[</span>
                <span class="s1">'--plugin'</span><span class="o">,</span> <span class="s1">'de.monochromata.cucumber.report.PrettyReports:build/reports/cucumber'</span><span class="o">,</span>
                <span class="s1">'--glue'</span><span class="o">,</span> <span class="s1">'io.ljn.jp.test.runner'</span><span class="o">,</span>
                <span class="s1">'src/main/resources'</span>
            <span class="o">]</span>
        <span class="o">}</span>
    <span class="o">}</span>
<span class="o">}</span>

</code></pre></div></div>

<p>Now when the cucumber task is run the report will be in the <code class="language-plaintext highlighter-rouge">build/reports/cucumber/cucumber-html-reports</code> folder.</p>

<h1 id="publishing">Publishing</h1>

<p>Having generated the report we can now plug it in to our Travis CI pipeline so that the results get published to a website.</p>

<p>Before doing this you will need to generate a GitHub personal access token. Travis CI provide <a href="https://help.github.com/articles/creating-an-access-token-for-command-line-use/">instructions on how to do this</a>. Once you’ve generated your token, add it to the environment variables for your build as <code class="language-plaintext highlighter-rouge">GITHUB_TOKEN</code>.</p>

<p>With the GitHub access token is set up we need to add a deploy step to <code class="language-plaintext highlighter-rouge">.travis.yml</code>:</p>

<div class="language-yaml highlighter-rouge"><div class="highlight"><pre class="highlight"><code><span class="na">script</span><span class="pi">:</span>
  <span class="pi">-</span> <span class="s">./gradlew check</span>
  <span class="pi">-</span> <span class="s">./gradlew cucumber || echo "done"</span>
<span class="na">before_deploy</span><span class="pi">:</span>
  <span class="pi">-</span> <span class="s">cp build/reports/cucumber/cucumber-html-reports/overview-features.html build/reports/cucumber/cucumber-html-reports/index.html</span>
<span class="na">deploy</span><span class="pi">:</span>
  <span class="na">local_dir</span><span class="pi">:</span> <span class="s">build/reports/cucumber/cucumber-html-reports</span>
  <span class="na">provider</span><span class="pi">:</span> <span class="s">pages</span>
  <span class="na">skip_cleanup</span><span class="pi">:</span> <span class="no">true</span>
  <span class="na">github_token</span><span class="pi">:</span> <span class="s">$GITHUB_TOKEN</span>
  <span class="na">keep_history</span><span class="pi">:</span> <span class="no">true</span>
  <span class="na">on</span><span class="pi">:</span>
    <span class="na">branch</span><span class="pi">:</span> <span class="s">master</span>
</code></pre></div></div>

<p>There are a couple of things to note in there.</p>

<p>First, <code class="language-plaintext highlighter-rouge">./gradlew cucumber || echo "done"</code> will avoid breaking the build if the cucumber tests fail. Travis will not run the deploy job if the build fails, adding <code class="language-plaintext highlighter-rouge">|| echo "done"</code> will force an exit code of 0. Depending on the context you may or may not want this.</p>

<p>Second, the <code class="language-plaintext highlighter-rouge">before_deploy</code> step is copying the <code class="language-plaintext highlighter-rouge">overview-features.html</code> file to <code class="language-plaintext highlighter-rouge">index.html</code> so the published website has a homepage.</p>

<p>Now if you go to your GitHub repository settings an enable GitHub pages you will see the report published the next time you run a build:</p>

<p><img src="/asset/img/publishing-cucumber-reports-with-travis/website.png" alt="website" class="img-responsive" /></p>

<h1 id="automating">Automating</h1>

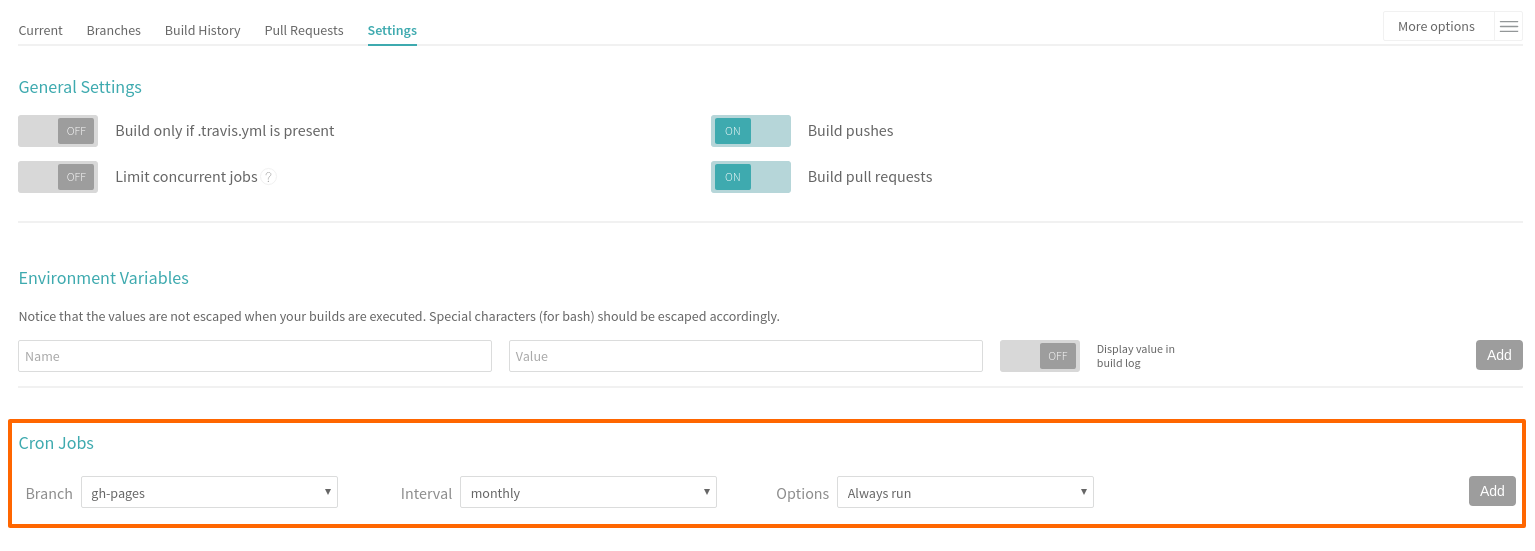
<p>You can go a step further and set up a <a href="https://docs.travis-ci.com/user/cron-jobs/">Travis Cron</a> to automatically run the build every day to regenerate the report.</p>

<p><img src="https://docs.travis-ci.com/images/cron-section.png" alt="cron" class="img-responsive" /></p>

<p>Then you’ll have fresh Cucumber reports every day.</p>]]></content><author><name></name></author><summary type="html"><![CDATA[A guide to publishing Cucumber reports using Travis CI and GitHub pages]]></summary></entry><entry><title type="html">Setting up Swagger with a Koa API</title><link href="https://ljn.io//posts/swagger-for-a-koa-api" rel="alternate" type="text/html" title="Setting up Swagger with a Koa API" /><published>2020-02-13T02:00:00+00:00</published><updated>2020-02-13T02:00:00+00:00</updated><id>https://ljn.io//posts/swagger-for-a-koa-api</id><content type="html" xml:base="https://ljn.io//posts/swagger-for-a-koa-api"><![CDATA[<p class="article-headline">Swagger has become the de-facto tool for API documentation. Not only does it provide a really good looking UI for the documentation, but it also allows you to validate the every request and response against the API definition.</p>

<p>This guide will show you how to set up an example Koa API complete with Swagger documentation and validation. No knowledge of Koa or Swagger is assumed.</p>

<h2 id="setting-up-an-api">Setting up an API</h2>

<p>Getting started with Swagger and Koa is super easy thanks to couple of packages - swagger2 and swagger2-koa:</p>

<div class="language-plaintext highlighter-rouge"><div class="highlight"><pre class="highlight"><code>npm init
npm install --save koa koa-router koa-bodyparser swagger2 and swagger2-koa
</code></pre></div></div>

<p>If we add a skeleton Koa API in start.js:</p>

<div class="language-javascript highlighter-rouge"><div class="highlight"><pre class="highlight"><code><span class="kd">const</span> <span class="nx">Koa</span> <span class="o">=</span> <span class="nx">require</span><span class="p">(</span><span class="dl">"</span><span class="s2">koa</span><span class="dl">"</span><span class="p">);</span>
<span class="kd">const</span> <span class="nx">app</span> <span class="o">=</span> <span class="k">new</span> <span class="nx">Koa</span><span class="p">();</span>
<span class="kd">const</span> <span class="nx">Router</span> <span class="o">=</span> <span class="nx">require</span><span class="p">(</span><span class="dl">"</span><span class="s2">koa-router</span><span class="dl">"</span><span class="p">);</span>

<span class="kd">const</span> <span class="nx">app</span> <span class="o">=</span> <span class="k">new</span> <span class="nx">Koa</span><span class="p">();</span>
<span class="kd">const</span> <span class="nx">router</span> <span class="o">=</span> <span class="k">new</span> <span class="nx">Router</span><span class="p">();</span>

<span class="nx">router</span><span class="p">.</span><span class="kd">get</span><span class="p">(</span><span class="dl">'</span><span class="s1">/health</span><span class="dl">'</span><span class="p">,</span> <span class="p">(</span><span class="nx">ctx</span><span class="p">,</span> <span class="nx">next</span><span class="p">)</span> <span class="o">=&gt;</span> <span class="p">{</span>
  <span class="nx">ctx</span><span class="p">.</span><span class="nx">body</span> <span class="o">=</span> <span class="p">{</span>
    <span class="dl">"</span><span class="s2">status</span><span class="dl">"</span><span class="p">:</span> <span class="dl">"</span><span class="s2">UP</span><span class="dl">"</span>
  <span class="p">};</span>
<span class="p">});</span>

<span class="nx">app</span>
  <span class="p">.</span><span class="nx">use</span><span class="p">(</span><span class="nx">router</span><span class="p">.</span><span class="nx">routes</span><span class="p">())</span>
  <span class="p">.</span><span class="nx">use</span><span class="p">(</span><span class="nx">router</span><span class="p">.</span><span class="nx">allowedMethods</span><span class="p">())</span>
  <span class="p">.</span><span class="nx">listen</span><span class="p">(</span><span class="mi">3000</span><span class="p">);</span>

<span class="nx">console</span><span class="p">.</span><span class="nx">log</span><span class="p">(</span><span class="dl">"</span><span class="s2">API started</span><span class="dl">"</span><span class="p">);</span>
</code></pre></div></div>

<p>Running <code class="language-plaintext highlighter-rouge">node start.js</code> and going to <code class="language-plaintext highlighter-rouge">http://localhost:3000/health</code> in a browser should reveal a JSON response saying that the service is up and running.</p>

<h2 id="adding-the-swagger-ui">Adding the Swagger UI</h2>

<p>Now that the API is up and running we can start defining it using a Swagger file <code class="language-plaintext highlighter-rouge">api.yaml</code>.</p>

<p>The first part of the yaml file is general information about the API:</p>

<div class="language-yaml highlighter-rouge"><div class="highlight"><pre class="highlight"><code><span class="na">swagger</span><span class="pi">:</span> <span class="s2">"</span><span class="s">2.0"</span>
<span class="na">info</span><span class="pi">:</span>
  <span class="na">title</span><span class="pi">:</span> <span class="s2">"</span><span class="s">Swagger</span><span class="nv"> </span><span class="s">Example"</span>
  <span class="na">description</span><span class="pi">:</span> <span class="pi">&gt;</span>
    <span class="s">This is an example Koa API.</span>
  <span class="na">version</span><span class="pi">:</span> <span class="s2">"</span><span class="s">1.0.0"</span>
<span class="na">host</span><span class="pi">:</span> <span class="s2">"</span><span class="s">localhost:3000"</span>
<span class="na">schemes</span><span class="pi">:</span>
  <span class="pi">-</span> <span class="s2">"</span><span class="s">http"</span>
</code></pre></div></div>

<p>Next we need to add our health endpoint to the same file:</p>

<div class="language-yaml highlighter-rouge"><div class="highlight"><pre class="highlight"><code><span class="na">paths</span><span class="pi">:</span>
  <span class="na">/health</span><span class="pi">:</span>
    <span class="na">get</span><span class="pi">:</span>
      <span class="na">summary</span><span class="pi">:</span> <span class="s2">"</span><span class="s">Check</span><span class="nv"> </span><span class="s">the</span><span class="nv"> </span><span class="s">status</span><span class="nv"> </span><span class="s">of</span><span class="nv"> </span><span class="s">the</span><span class="nv"> </span><span class="s">service"</span>
      <span class="na">description</span><span class="pi">:</span> <span class="s2">"</span><span class="s">If</span><span class="nv"> </span><span class="s">the</span><span class="nv"> </span><span class="s">service</span><span class="nv"> </span><span class="s">is</span><span class="nv"> </span><span class="s">up</span><span class="nv"> </span><span class="s">and</span><span class="nv"> </span><span class="s">running</span><span class="nv"> </span><span class="s">correctly</span><span class="nv"> </span><span class="s">the</span><span class="nv"> </span><span class="s">response</span><span class="nv"> </span><span class="s">will</span><span class="nv"> </span><span class="s">be</span><span class="nv"> </span><span class="s">'UP'"</span>
      <span class="na">consumes</span><span class="pi">:</span>
        <span class="pi">-</span> <span class="s2">"</span><span class="s">application/json"</span>
      <span class="na">produces</span><span class="pi">:</span>
        <span class="pi">-</span> <span class="s2">"</span><span class="s">application/json"</span>
      <span class="na">responses</span><span class="pi">:</span>
        <span class="na">200</span><span class="pi">:</span>
          <span class="na">description</span><span class="pi">:</span> <span class="s2">"</span><span class="s">Service</span><span class="nv"> </span><span class="s">is</span><span class="nv"> </span><span class="s">up</span><span class="nv"> </span><span class="s">and</span><span class="nv"> </span><span class="s">healthy"</span>
          <span class="na">schema</span><span class="pi">:</span>
            <span class="na">$ref</span><span class="pi">:</span> <span class="s2">"</span><span class="s">#/definitions/Health"</span>
        <span class="na">500</span><span class="pi">:</span>
          <span class="na">$ref</span><span class="pi">:</span> <span class="s1">'</span><span class="s">#/responses/500'</span>

<span class="na">responses</span><span class="pi">:</span>
  <span class="na">500</span><span class="pi">:</span>
    <span class="na">description</span><span class="pi">:</span> <span class="s">Internal Server Error</span>
    <span class="na">schema</span><span class="pi">:</span>
      <span class="na">$ref</span><span class="pi">:</span> <span class="s1">'</span><span class="s">#/definitions/Error'</span>

<span class="na">definitions</span><span class="pi">:</span>
  <span class="na">Health</span><span class="pi">:</span>
    <span class="na">type</span><span class="pi">:</span> <span class="s2">"</span><span class="s">object"</span>
    <span class="na">properties</span><span class="pi">:</span>
      <span class="na">status</span><span class="pi">:</span>
        <span class="na">type</span><span class="pi">:</span> <span class="s2">"</span><span class="s">string"</span>
        <span class="na">enum</span><span class="pi">:</span>
          <span class="pi">-</span> <span class="s2">"</span><span class="s">UP"</span>
          <span class="pi">-</span> <span class="s2">"</span><span class="s">DOWN"</span>

</code></pre></div></div>

<p>Structuring Swagger files is a bit of an art form but I’ve found it useful to have re-usable responses for errors such as 500 that is defined in the responses section of the yaml file.</p>

<p>Next we add the swagger UI middleware to our Koa server:</p>

<div class="language-javascript highlighter-rouge"><div class="highlight"><pre class="highlight"><code><span class="kd">const</span> <span class="nx">Koa</span> <span class="o">=</span> <span class="nx">require</span><span class="p">(</span><span class="dl">"</span><span class="s2">koa</span><span class="dl">"</span><span class="p">);</span>
<span class="kd">const</span> <span class="nx">swagger</span> <span class="o">=</span> <span class="nx">require</span><span class="p">(</span><span class="dl">"</span><span class="s2">swagger2</span><span class="dl">"</span><span class="p">);</span>
<span class="kd">const</span> <span class="nx">Router</span> <span class="o">=</span> <span class="nx">require</span><span class="p">(</span><span class="dl">"</span><span class="s2">koa-router</span><span class="dl">"</span><span class="p">);</span>
<span class="kd">const</span> <span class="p">{</span> <span class="nx">ui</span><span class="p">,</span> <span class="nx">validate</span> <span class="p">}</span> <span class="o">=</span> <span class="nx">require</span><span class="p">(</span><span class="dl">"</span><span class="s2">swagger2-koa</span><span class="dl">"</span><span class="p">);</span>

<span class="kd">const</span> <span class="nx">swaggerDocument</span> <span class="o">=</span> <span class="nx">swagger</span><span class="p">.</span><span class="nx">loadDocumentSync</span><span class="p">(</span><span class="dl">"</span><span class="s2">api.yaml</span><span class="dl">"</span><span class="p">);</span>
<span class="kd">const</span> <span class="nx">app</span> <span class="o">=</span> <span class="k">new</span> <span class="nx">Koa</span><span class="p">();</span>
<span class="kd">const</span> <span class="nx">router</span> <span class="o">=</span> <span class="k">new</span> <span class="nx">Router</span><span class="p">();</span>

<span class="nx">router</span><span class="p">.</span><span class="kd">get</span><span class="p">(</span><span class="dl">'</span><span class="s1">/health</span><span class="dl">'</span><span class="p">,</span> <span class="p">(</span><span class="nx">ctx</span><span class="p">,</span> <span class="nx">next</span><span class="p">)</span> <span class="o">=&gt;</span> <span class="p">{</span>
  <span class="nx">ctx</span><span class="p">.</span><span class="nx">body</span> <span class="o">=</span> <span class="p">{</span>
    <span class="dl">"</span><span class="s2">status</span><span class="dl">"</span><span class="p">:</span> <span class="dl">"</span><span class="s2">UP</span><span class="dl">"</span>
  <span class="p">};</span>
<span class="p">});</span>

<span class="nx">app</span>
  <span class="p">.</span><span class="nx">use</span><span class="p">(</span><span class="nx">ui</span><span class="p">(</span><span class="nx">swaggerDocument</span><span class="p">,</span> <span class="dl">"</span><span class="s2">/swagger</span><span class="dl">"</span><span class="p">))</span>
  <span class="p">.</span><span class="nx">use</span><span class="p">(</span><span class="nx">router</span><span class="p">.</span><span class="nx">routes</span><span class="p">())</span>
  <span class="p">.</span><span class="nx">use</span><span class="p">(</span><span class="nx">router</span><span class="p">.</span><span class="nx">allowedMethods</span><span class="p">())</span>
  <span class="p">.</span><span class="nx">listen</span><span class="p">(</span><span class="mi">3000</span><span class="p">);</span>

<span class="nx">console</span><span class="p">.</span><span class="nx">log</span><span class="p">(</span><span class="dl">"</span><span class="s2">API started</span><span class="dl">"</span><span class="p">);</span>
</code></pre></div></div>

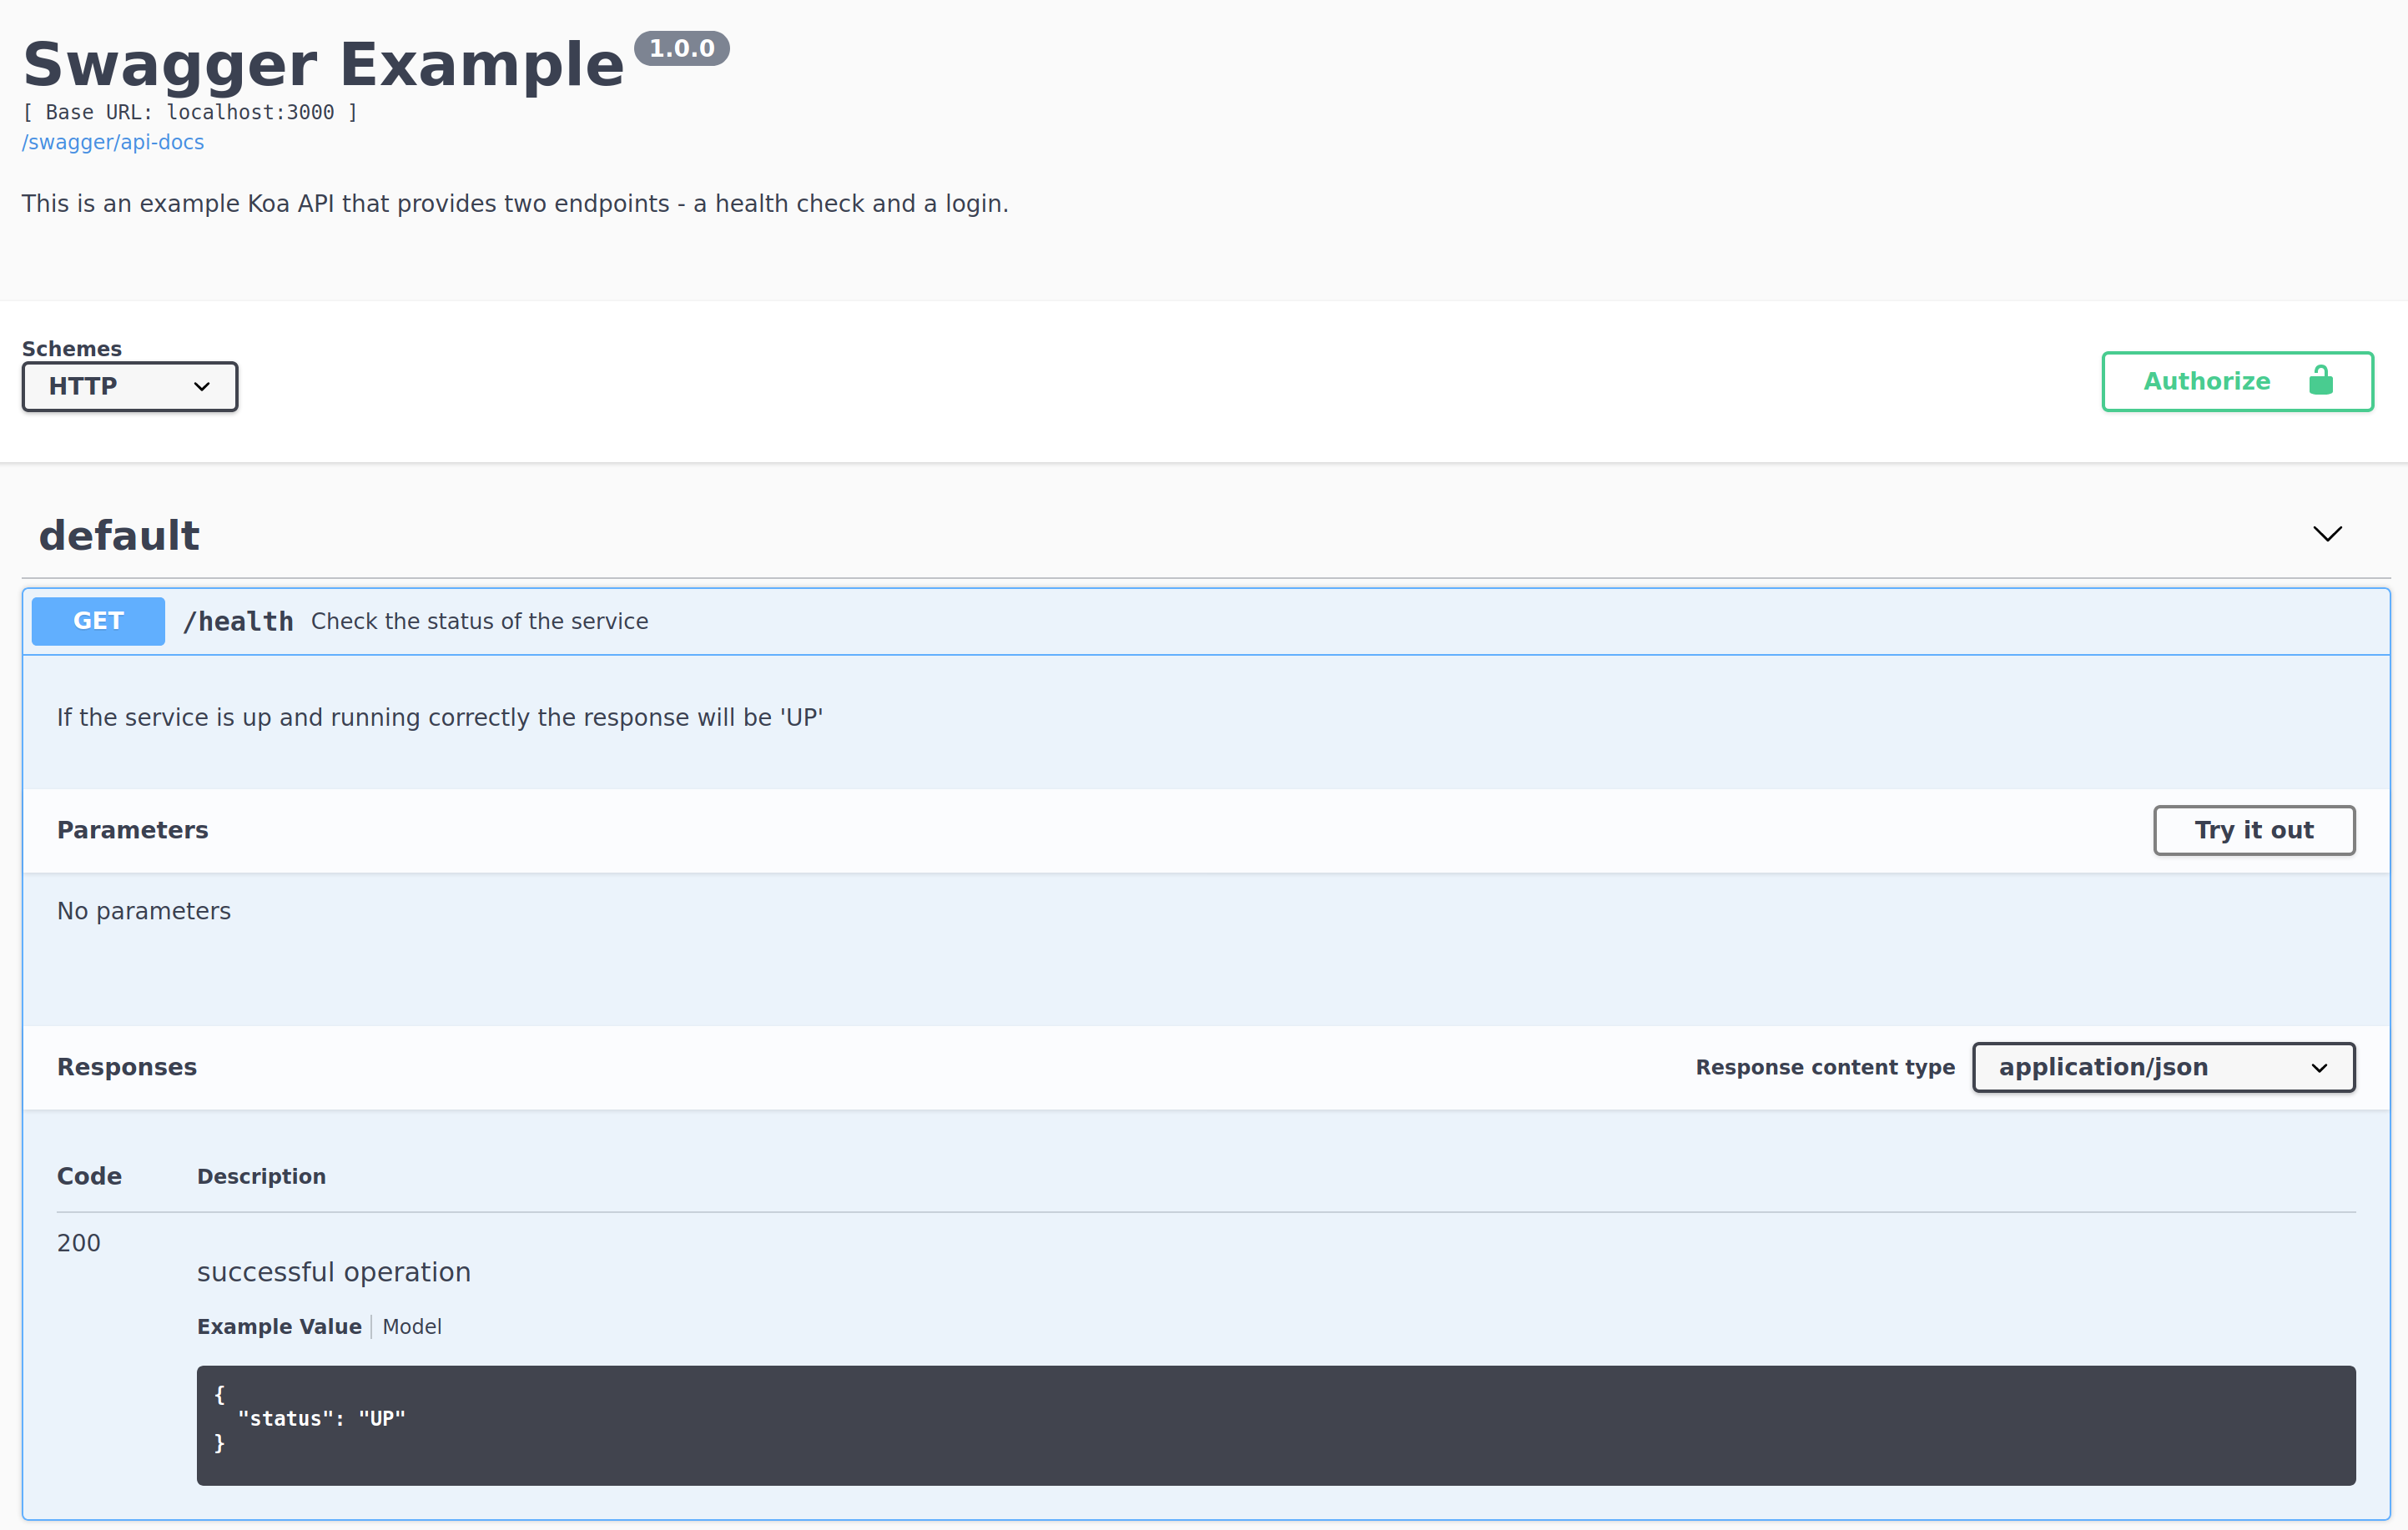
<p>Now when we boot up the application we can go to <code class="language-plaintext highlighter-rouge">http://localhost:3000/swagger</code> and view the documentation. It should look something like:</p>

<p><img src="/asset/img/koa-swagger/1.swagger.png" alt="swagger" class="img-responsive" /></p>

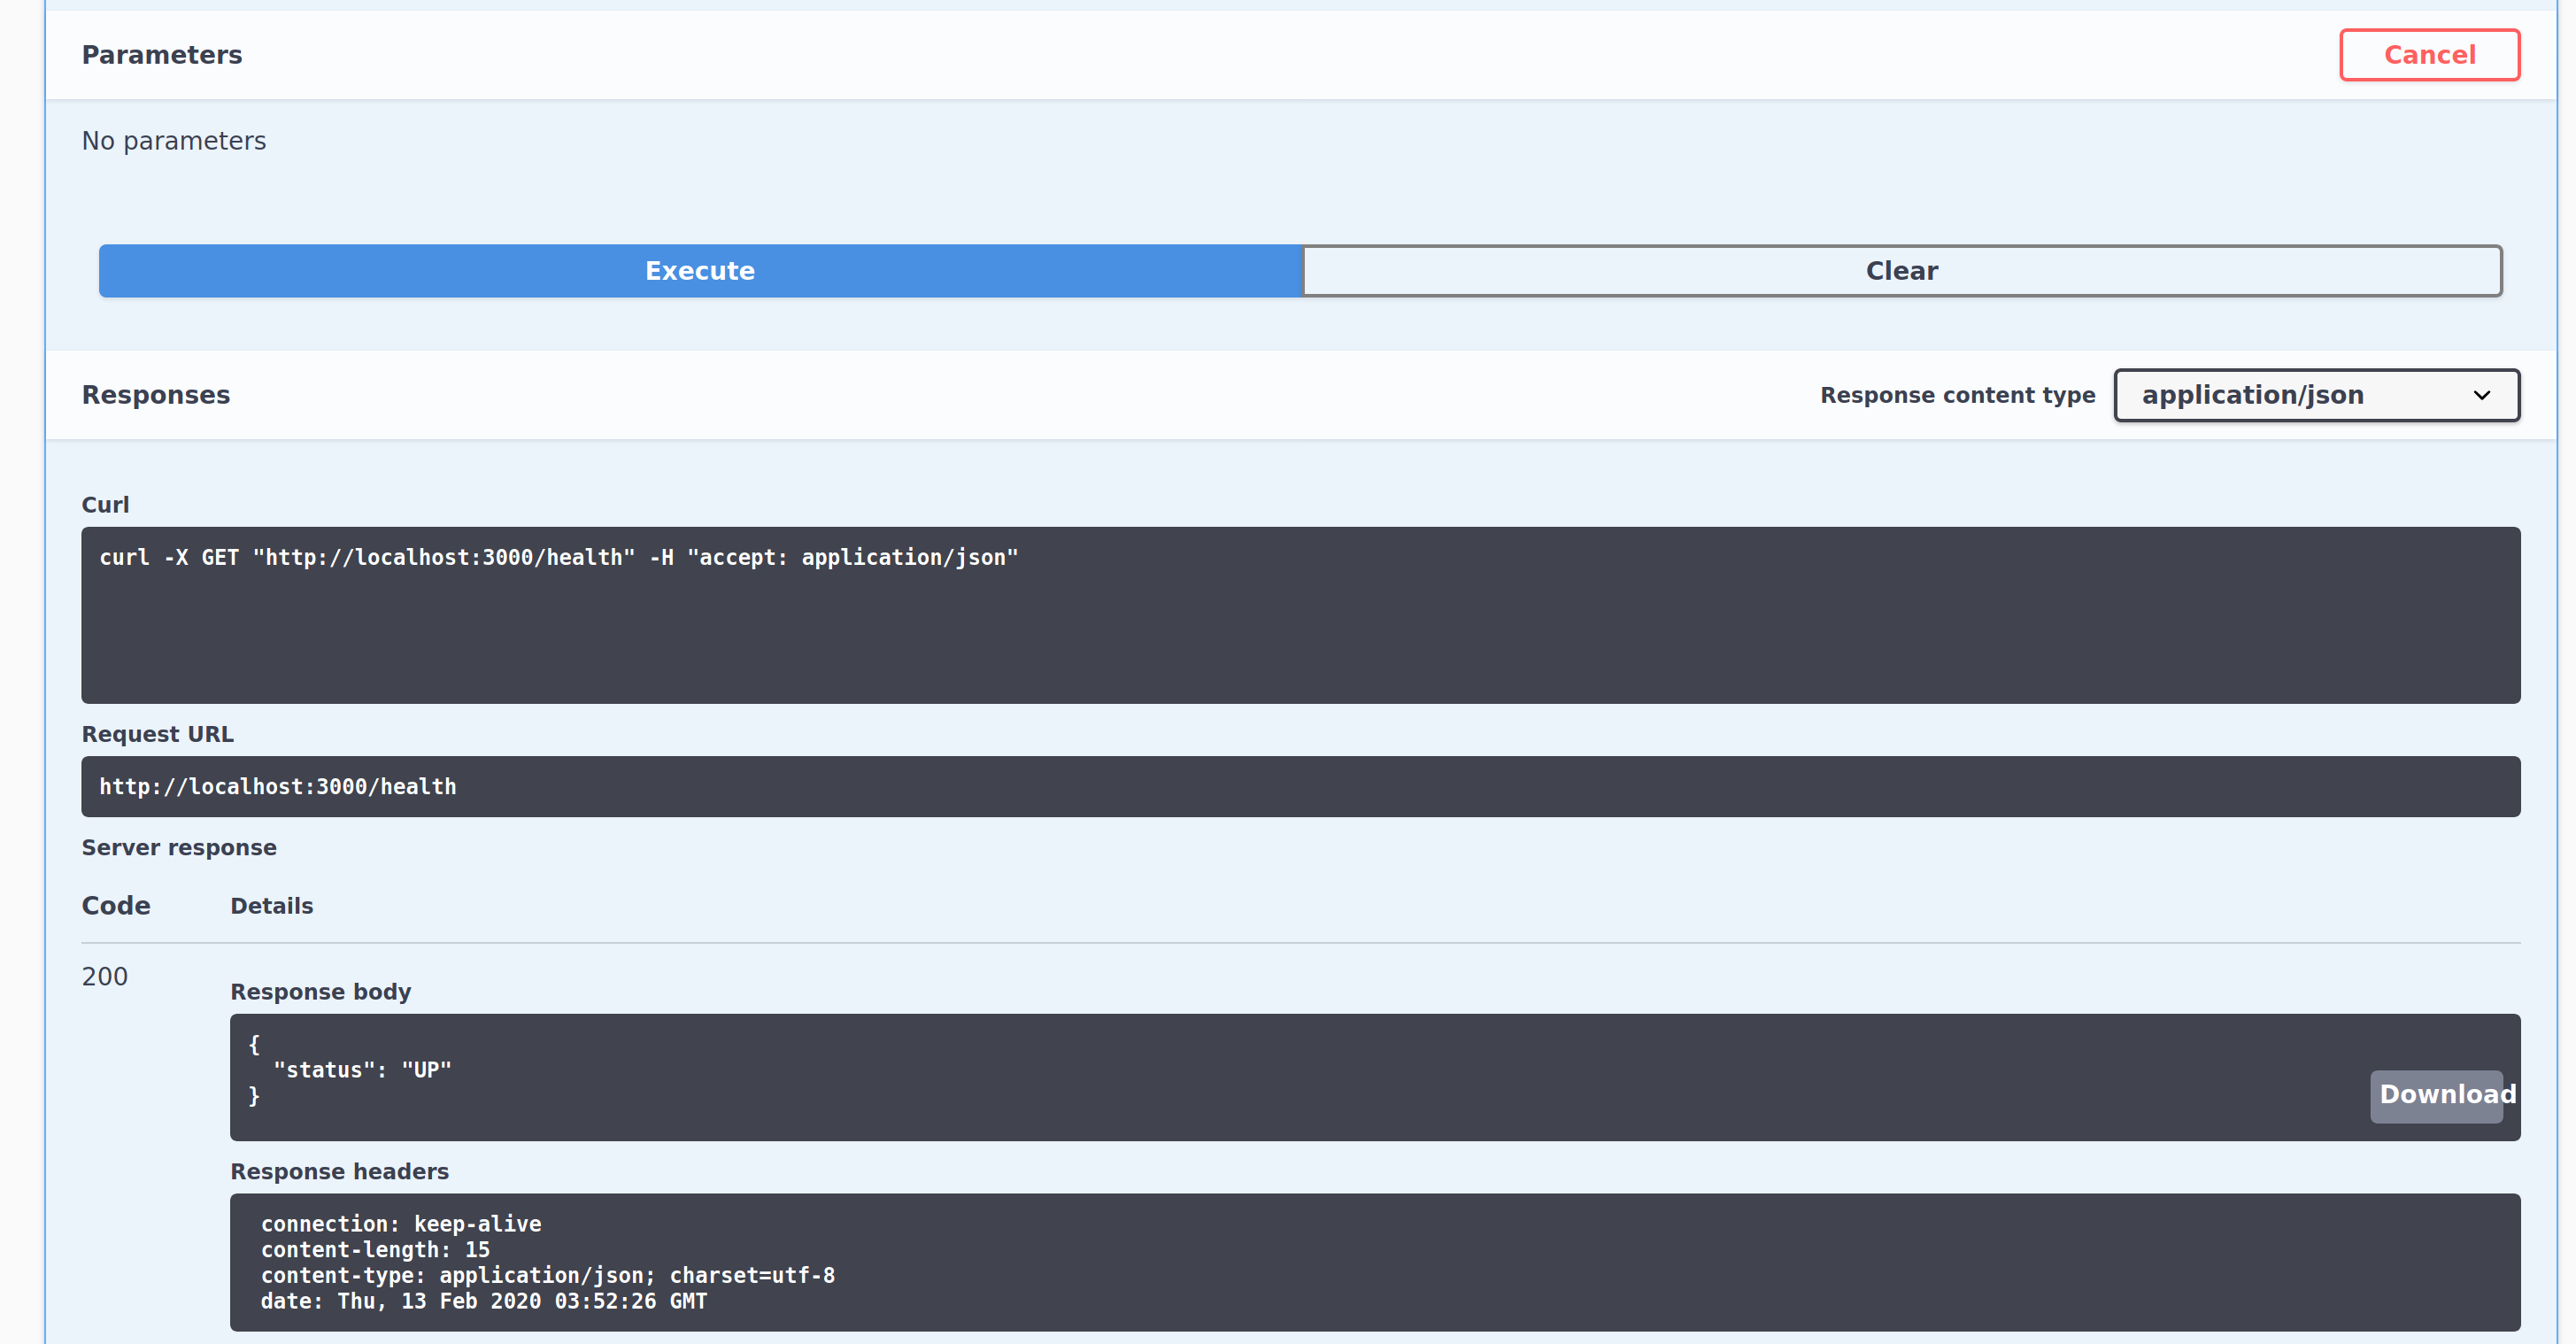
<p>Not only is this use clean and easy to use, it also has an inbuilt HTTP client to test each endpoint. Click <code class="language-plaintext highlighter-rouge">Try it out</code> and then <code class="language-plaintext highlighter-rouge">Execute</code> and it will display the response and response headers in the browser:</p>

<p><img src="/asset/img/koa-swagger/2.http-client.png" alt="http-client" class="img-responsive" /></p>

<h2 id="adding-validation">Adding validation</h2>

<p>To set up the API validation we can add a new endpoint <code class="language-plaintext highlighter-rouge">/login</code> that will take a POST request containing a username and password, and return a token if the login is successful.</p>

<div class="language-yaml highlighter-rouge"><div class="highlight"><pre class="highlight"><code>  <span class="na">/login</span><span class="pi">:</span>
    <span class="na">post</span><span class="pi">:</span>
      <span class="na">consumes</span><span class="pi">:</span>
        <span class="pi">-</span> <span class="s2">"</span><span class="s">application/json"</span>
      <span class="na">produces</span><span class="pi">:</span>
        <span class="pi">-</span> <span class="s2">"</span><span class="s">application/json"</span>
      <span class="na">parameters</span><span class="pi">:</span>
        <span class="pi">-</span> <span class="na">in</span><span class="pi">:</span> <span class="s2">"</span><span class="s">body"</span>
          <span class="na">name</span><span class="pi">:</span> <span class="s2">"</span><span class="s">body"</span>
          <span class="na">required</span><span class="pi">:</span> <span class="no">true</span>
          <span class="na">schema</span><span class="pi">:</span>
            <span class="na">$ref</span><span class="pi">:</span> <span class="s2">"</span><span class="s">#/definitions/LoginRequest"</span>
      <span class="na">responses</span><span class="pi">:</span>
        <span class="na">201</span><span class="pi">:</span>
          <span class="na">description</span><span class="pi">:</span> <span class="s2">"</span><span class="s">successful</span><span class="nv"> </span><span class="s">operation"</span>
          <span class="na">schema</span><span class="pi">:</span>
            <span class="na">$ref</span><span class="pi">:</span> <span class="s2">"</span><span class="s">#/definitions/LoginResponse"</span>
        <span class="na">400</span><span class="pi">:</span>
          <span class="na">$ref</span><span class="pi">:</span> <span class="s1">'</span><span class="s">#/responses/400'</span>
        <span class="na">401</span><span class="pi">:</span>
          <span class="na">$ref</span><span class="pi">:</span> <span class="s1">'</span><span class="s">#/responses/401'</span>

  <span class="c1"># ... other responses</span>

  <span class="na">LoginRequest</span><span class="pi">:</span>
    <span class="na">type</span><span class="pi">:</span> <span class="s2">"</span><span class="s">object"</span>
    <span class="na">required</span><span class="pi">:</span>
      <span class="pi">-</span> <span class="s">username</span>
      <span class="pi">-</span> <span class="s">password</span>
    <span class="na">properties</span><span class="pi">:</span>
      <span class="na">username</span><span class="pi">:</span>
        <span class="na">type</span><span class="pi">:</span> <span class="s2">"</span><span class="s">string"</span>
        <span class="na">example</span><span class="pi">:</span> <span class="s2">"</span><span class="s">username@email.com"</span>
      <span class="na">password</span><span class="pi">:</span>
        <span class="na">type</span><span class="pi">:</span> <span class="s2">"</span><span class="s">string"</span>
        <span class="na">example</span><span class="pi">:</span> <span class="s2">"</span><span class="s">secret"</span>

  <span class="na">LoginResponse</span><span class="pi">:</span>
    <span class="na">type</span><span class="pi">:</span> <span class="s2">"</span><span class="s">object"</span>
    <span class="na">properties</span><span class="pi">:</span>
      <span class="na">data</span><span class="pi">:</span>
        <span class="na">type</span><span class="pi">:</span> <span class="s2">"</span><span class="s">object"</span>
        <span class="na">properties</span><span class="pi">:</span>
          <span class="na">token</span><span class="pi">:</span>
            <span class="na">type</span><span class="pi">:</span> <span class="s2">"</span><span class="s">string"</span>
            <span class="na">example</span><span class="pi">:</span> <span class="s2">"</span><span class="s">dfjghjk34h5kjhdfkjdfgklj76l8k"</span>
      <span class="na">links</span><span class="pi">:</span>
        <span class="na">type</span><span class="pi">:</span> <span class="s2">"</span><span class="s">object"</span>

</code></pre></div></div>

<p>The full api.yaml can be seen on <a href="https://github.com/linusnorton/koa-swagger/blob/master/api.yaml">GitHub</a>.</p>

<p>Next, we need to add the endpoint and validation middleware. As it’s a POST request we’ll also need the bodyParser middleware:</p>

<div class="language-javascript highlighter-rouge"><div class="highlight"><pre class="highlight"><code>
 <span class="nx">router</span><span class="p">.</span><span class="nx">post</span><span class="p">(</span><span class="dl">'</span><span class="s1">/login</span><span class="dl">'</span><span class="p">,</span> <span class="p">(</span><span class="nx">ctx</span><span class="p">,</span> <span class="nx">next</span><span class="p">)</span> <span class="o">=&gt;</span> <span class="p">{</span>
   <span class="k">if</span> <span class="p">(</span><span class="nx">ctx</span><span class="p">.</span><span class="nx">request</span><span class="p">.</span><span class="nx">body</span><span class="p">.</span><span class="nx">username</span> <span class="o">===</span> <span class="dl">"</span><span class="s2">admin</span><span class="dl">"</span> <span class="o">&amp;&amp;</span> <span class="nx">ctx</span><span class="p">.</span><span class="nx">request</span><span class="p">.</span><span class="nx">body</span><span class="p">.</span><span class="nx">password</span> <span class="o">===</span> <span class="dl">"</span><span class="s2">password</span><span class="dl">"</span><span class="p">)</span> <span class="p">{</span>
     <span class="nx">ctx</span><span class="p">.</span><span class="nx">body</span> <span class="o">=</span> <span class="p">{</span> <span class="dl">"</span><span class="s2">data</span><span class="dl">"</span><span class="p">:</span> <span class="p">{</span> <span class="na">token</span><span class="p">:</span> <span class="dl">"</span><span class="s2">atoken</span><span class="dl">"</span> <span class="p">}</span> <span class="p">};</span>
     <span class="nx">ctx</span><span class="p">.</span><span class="nx">status</span> <span class="o">=</span> <span class="mi">201</span><span class="p">;</span>
   <span class="p">}</span>
   <span class="k">else</span> <span class="p">{</span>
     <span class="nx">ctx</span><span class="p">.</span><span class="nx">body</span> <span class="o">=</span> <span class="p">{</span> <span class="dl">"</span><span class="s2">data</span><span class="dl">"</span><span class="p">:</span> <span class="p">{</span> <span class="na">error</span><span class="p">:</span> <span class="dl">"</span><span class="s2">invalid login</span><span class="dl">"</span> <span class="p">}</span> <span class="p">};</span>
     <span class="nx">ctx</span><span class="p">.</span><span class="nx">status</span> <span class="o">=</span> <span class="mi">401</span><span class="p">;</span>
   <span class="p">}</span>
 <span class="p">});</span>

 <span class="nx">app</span>
   <span class="p">.</span><span class="nx">use</span><span class="p">(</span><span class="nx">bodyParser</span><span class="p">())</span>
   <span class="p">.</span><span class="nx">use</span><span class="p">(</span><span class="nx">ui</span><span class="p">(</span><span class="nx">swaggerDocument</span><span class="p">,</span> <span class="dl">"</span><span class="s2">/swagger</span><span class="dl">"</span><span class="p">))</span>
   <span class="p">.</span><span class="nx">use</span><span class="p">(</span><span class="nx">validate</span><span class="p">(</span><span class="nx">swaggerDocument</span><span class="p">))</span>
   <span class="p">.</span><span class="nx">use</span><span class="p">(</span><span class="nx">router</span><span class="p">.</span><span class="nx">routes</span><span class="p">())</span>
   <span class="p">.</span><span class="nx">use</span><span class="p">(</span><span class="nx">router</span><span class="p">.</span><span class="nx">allowedMethods</span><span class="p">())</span>
   <span class="p">.</span><span class="nx">listen</span><span class="p">(</span><span class="mi">3000</span><span class="p">);</span>
</code></pre></div></div>

<p>Now restarting the app and going to <code class="language-plaintext highlighter-rouge">http://localhost:3000/swagger</code> will show the new endpoint. Hitting <code class="language-plaintext highlighter-rouge">Try it out</code> will bring up a form and let us start experimenting with different requests.</p>

<p>By default the example values from the yaml file will be populated:</p>

<div class="language-javascript highlighter-rouge"><div class="highlight"><pre class="highlight"><code><span class="p">{</span>
  <span class="dl">"</span><span class="s2">username</span><span class="dl">"</span><span class="p">:</span> <span class="dl">"</span><span class="s2">username@email.com</span><span class="dl">"</span><span class="p">,</span>
  <span class="dl">"</span><span class="s2">password</span><span class="dl">"</span><span class="p">:</span> <span class="dl">"</span><span class="s2">secret</span><span class="dl">"</span>
<span class="p">}</span>
</code></pre></div></div>

<p>Sending that request should return a 401:</p>

<div class="language-javascript highlighter-rouge"><div class="highlight"><pre class="highlight"><code><span class="p">{</span>
  <span class="dl">"</span><span class="s2">data</span><span class="dl">"</span><span class="p">:</span> <span class="p">{</span>
    <span class="dl">"</span><span class="s2">error</span><span class="dl">"</span><span class="p">:</span> <span class="dl">"</span><span class="s2">invalid login</span><span class="dl">"</span>
  <span class="p">}</span>
<span class="p">}</span>
</code></pre></div></div>

<p>Setting the username to <code class="language-plaintext highlighter-rouge">admin</code> and the password to <code class="language-plaintext highlighter-rouge">password</code> should return a 201 with a token in the response:</p>

<div class="language-javascript highlighter-rouge"><div class="highlight"><pre class="highlight"><code><span class="p">{</span>
  <span class="dl">"</span><span class="s2">data</span><span class="dl">"</span><span class="p">:</span> <span class="p">{</span>
    <span class="dl">"</span><span class="s2">token</span><span class="dl">"</span><span class="p">:</span> <span class="dl">"</span><span class="s2">atoken</span><span class="dl">"</span>
  <span class="p">}</span>
<span class="p">}</span>
</code></pre></div></div>

<p>And finally, sending an invalid request by removing one of the fields will return a 400 with an error from the Swagger validator:</p>

<div class="language-javascript highlighter-rouge"><div class="highlight"><pre class="highlight"><code><span class="p">{</span>
  <span class="dl">"</span><span class="s2">code</span><span class="dl">"</span><span class="p">:</span> <span class="dl">"</span><span class="s2">SWAGGER_REQUEST_VALIDATION_FAILED</span><span class="dl">"</span><span class="p">,</span>
  <span class="dl">"</span><span class="s2">errors</span><span class="dl">"</span><span class="p">:</span> <span class="p">[</span>
    <span class="p">{</span>
      <span class="dl">"</span><span class="s2">actual</span><span class="dl">"</span><span class="p">:</span> <span class="p">{</span>
        <span class="dl">"</span><span class="s2">username</span><span class="dl">"</span><span class="p">:</span> <span class="dl">"</span><span class="s2">admin</span><span class="dl">"</span>
      <span class="p">},</span>
      <span class="dl">"</span><span class="s2">expected</span><span class="dl">"</span><span class="p">:</span> <span class="p">{</span>
        <span class="dl">"</span><span class="s2">schema</span><span class="dl">"</span><span class="p">:</span> <span class="p">{</span>
          <span class="dl">"</span><span class="s2">type</span><span class="dl">"</span><span class="p">:</span> <span class="dl">"</span><span class="s2">object</span><span class="dl">"</span><span class="p">,</span>
          <span class="dl">"</span><span class="s2">required</span><span class="dl">"</span><span class="p">:</span> <span class="p">[</span>
            <span class="dl">"</span><span class="s2">username</span><span class="dl">"</span><span class="p">,</span>
            <span class="dl">"</span><span class="s2">password</span><span class="dl">"</span>
          <span class="p">],</span>
          <span class="dl">"</span><span class="s2">properties</span><span class="dl">"</span><span class="p">:</span> <span class="p">{</span>
            <span class="dl">"</span><span class="s2">username</span><span class="dl">"</span><span class="p">:</span> <span class="p">{</span>
              <span class="dl">"</span><span class="s2">type</span><span class="dl">"</span><span class="p">:</span> <span class="dl">"</span><span class="s2">string</span><span class="dl">"</span><span class="p">,</span>
              <span class="dl">"</span><span class="s2">example</span><span class="dl">"</span><span class="p">:</span> <span class="dl">"</span><span class="s2">username@email.com</span><span class="dl">"</span>
            <span class="p">},</span>
            <span class="dl">"</span><span class="s2">password</span><span class="dl">"</span><span class="p">:</span> <span class="p">{</span>
              <span class="dl">"</span><span class="s2">type</span><span class="dl">"</span><span class="p">:</span> <span class="dl">"</span><span class="s2">string</span><span class="dl">"</span><span class="p">,</span>
              <span class="dl">"</span><span class="s2">example</span><span class="dl">"</span><span class="p">:</span> <span class="dl">"</span><span class="s2">secret</span><span class="dl">"</span>
            <span class="p">}</span>
          <span class="p">}</span>
        <span class="p">}</span>
      <span class="p">},</span>
      <span class="dl">"</span><span class="s2">error</span><span class="dl">"</span><span class="p">:</span> <span class="dl">"</span><span class="s2">data.password is required</span><span class="dl">"</span><span class="p">,</span>
      <span class="dl">"</span><span class="s2">where</span><span class="dl">"</span><span class="p">:</span> <span class="dl">"</span><span class="s2">body</span><span class="dl">"</span>
    <span class="p">}</span>
  <span class="p">]</span>
<span class="p">}</span>
</code></pre></div></div>

<p>It’s quite a helpful, if verbose, response. It tells the client that they have omitted the password field and gives an extract from the documentation.</p>

<p>That’s it! It doesn’t necessarily mean you don’t need to provide your own layer of input validation but it certainly covers the most basic cases: missing fields, invalid types etc.</p>

<h2 id="further-reading">Further reading</h2>

<p>A full code example of this project can be found on <a href="https://github.com/linusnorton/koa-swagger">GitHub</a>.</p>

<p>Swagger files can become very verbose and there is a lot you can do with them. I recommend using the <a href="https://editor.swagger.io/">Swagger Editor</a> if only for the very complete example file it contains.</p>]]></content><author><name></name></author><summary type="html"><![CDATA[A brief guide to setting up Swagger API documentation with a Koa API.]]></summary></entry><entry><title type="html">Continuous deployment video guide</title><link href="https://ljn.io//posts/continuous-deployment-video-tutorial" rel="alternate" type="text/html" title="Continuous deployment video guide" /><published>2020-01-16T08:00:00+00:00</published><updated>2020-01-16T08:00:00+00:00</updated><id>https://ljn.io//posts/continuous-deployment-video-tutorial</id><content type="html" xml:base="https://ljn.io//posts/continuous-deployment-video-tutorial"><![CDATA[<p>Following last month’s <a href="/posts/2019-12-03-continuous-deployment-on-a-budget">guide to continuous deployment with Travis CI and PM2</a> is a video tutorial delivered as part of Solirius’ internal training.</p>

<iframe width="800" height="450" src="https://youtube.com/embed/krWcDP4LRT8" frameborder="0" allowfullscreen=""></iframe>

<p>The code for the demo is available on <a href="https://www.github.com/linusnorton/continuous-deployment-demo">GitHub</a>. Each step of the process in a branch step1 to step7 and the final result is in the master branch. The build is available on <a href="https://travis-ci.org/linusnorton/continuous-deployment-demo">Travis</a> but the deployment key has been disabled as it is visible during the demo.</p>]]></content><author><name></name></author><summary type="html"><![CDATA[A video guide to continuous deployment with Travis CI and PM2]]></summary></entry><entry><title type="html">Continuous deployment on a budget</title><link href="https://ljn.io//posts/continuous-deployment-on-a-budget" rel="alternate" type="text/html" title="Continuous deployment on a budget" /><published>2019-12-03T09:00:00+00:00</published><updated>2019-12-03T09:00:00+00:00</updated><id>https://ljn.io//posts/continuous-deployment-on-a-budget</id><content type="html" xml:base="https://ljn.io//posts/continuous-deployment-on-a-budget"><![CDATA[<p class="article-headline">In a corporate environment continuous deployment pipelines tend to get very complicated very fast. The sheer number of tools in use can be staggering: docker, kubernetes, helm, flux and terraform are all commonplace now. If your working on a small side project all this can be overkill. Luckily, it’s easy to set up something simple and free.</p>

<p>In this post we’re going to set up a continuous integration and continuous deployment pipeline for a node.js app using <a href="https://travis-ci.org">Travis</a> and <a href="https://pm2.keymetrics.io/">PM2</a>.</p>

<h2 id="continuous-integration">Continuous integration</h2>

<p>Travis is a widely used continuous integration service that is simple to use, and most importantly, free for open source projects.</p>

<h3 id="configuration">Configuration</h3>

<p>The first step is to add a <code class="language-plaintext highlighter-rouge">.travis.yml</code> configuration file to your repository. A basic example for a node.js app would be:</p>

<div class="language-yaml highlighter-rouge"><div class="highlight"><pre class="highlight"><code><span class="na">language</span><span class="pi">:</span> <span class="s">node_js</span>
<span class="na">node_js</span><span class="pi">:</span>
  <span class="pi">-</span> <span class="m">12</span>
<span class="na">install</span><span class="pi">:</span> <span class="s">npm install</span>
<span class="na">scripts</span><span class="pi">:</span>
  <span class="pi">-</span> <span class="s">npm test</span>
</code></pre></div></div>

<p>This configuration pretty straight forward, Travis will check out the code from GitHub, run <code class="language-plaintext highlighter-rouge">npm install</code> and then <code class="language-plaintext highlighter-rouge">npm test</code>. If both these commands exit normally then the build will be a success.</p>

<p>It’s also possible to test against multiple versions of node.js by adding them to the <code class="language-plaintext highlighter-rouge">node_js</code> field:</p>

<div class="language-yaml highlighter-rouge"><div class="highlight"><pre class="highlight"><code><span class="na">node_js</span><span class="pi">:</span>
  <span class="pi">-</span> <span class="m">12</span>
  <span class="pi">-</span> <span class="m">10</span>
  <span class="pi">-</span> <span class="m">8</span>
</code></pre></div></div>

<p>Add the <code class="language-plaintext highlighter-rouge">.travis.yml</code> to the root folder of your project and push it to GitHub.</p>

<h3 id="account">Account</h3>

<p>Now that the configuration has been added to your repository it’s time to set up the project in Travis. Go to <a href="https://travis-ci.org">travis-ci.org</a> and create an account if you don’t already have one. When you sign up it will ask you to authorize the travis app so that it can access your repositories.</p>

<p>Press the plus sign to add a repository:</p>

<p><img src="/asset/img/continuous-deployment-on-a-budget/1.png" alt="add-repo" class="img-responsive" /></p>

<p>If your repository is not listed then trigger a scan of your account and it should appear.</p>

<p><img src="/asset/img/continuous-deployment-on-a-budget/2.png" alt="trigger-scan" class="img-responsive" /></p>

<p>Then you can toggle the build to on:</p>

<p><img src="/asset/img/continuous-deployment-on-a-budget/3.png" alt="enable-travis" class="img-responsive" /></p>

<p>Now when you push changes to master or create PRs Travis will automatically run tests for you. You also get to add a trendy shield to your projects README.md:</p>

<div class="language-md highlighter-rouge"><div class="highlight"><pre class="highlight"><code><span class="p">[</span><span class="nv">![Travis</span><span class="p">](</span><span class="sx">https://img.shields.io/travis/</span><span class="nt">&lt;your-org&gt;</span>/<span class="nt">&lt;your-repo&gt;</span>.svg?style=flat-square)](https://travis-ci.org/<span class="nt">&lt;your-org&gt;</span>/<span class="nt">&lt;your-repo&gt;</span>)
</code></pre></div></div>

<h2 id="continuous-deployment">Continuous deployment</h2>

<p>Now that the continuous integration is set up we’re going to modify the <code class="language-plaintext highlighter-rouge">.travis.yml</code> configuration to deploy the changes to a server after a successful build, but first we need to create a deployment key so Travis can access the server.</p>

<h3 id="create-a-deployment-key">Create a deployment key</h3>

<p>You can create a key with this command:</p>

<div class="language-bash highlighter-rouge"><div class="highlight"><pre class="highlight"><code>ssh-keygen <span class="nt">-t</span> rsa <span class="nt">-b</span> 4096 <span class="nt">-C</span> <span class="s2">"DeployKey"</span>
</code></pre></div></div>

<p>It will prompt you for a passphrase but you can leave it blank. For the purpose of this example I will assume the key is called <code class="language-plaintext highlighter-rouge">deploy</code> but it can be whatever you choose.</p>

<p>Add the key to your server(s):</p>

<div class="language-bash highlighter-rouge"><div class="highlight"><pre class="highlight"><code>scp deploy.pub &lt;your-user&gt;@&lt;your-server-ip&gt;:/home/&lt;your-user&gt;/.ssh
ssh &lt;your-user&gt;@&lt;your-server-ip&gt;
<span class="nb">cd</span> .ssh
<span class="nb">cat </span>deploy.pub <span class="o">&gt;&gt;</span> authorized_keys
</code></pre></div></div>

<p>You can test the key by logging out of your server and then trying to connect again with:</p>

<div class="language-bash highlighter-rouge"><div class="highlight"><pre class="highlight"><code>ssh <span class="nt">-i</span> deploy &lt;your-user&gt;@&lt;your-server-ip&gt;
</code></pre></div></div>

<p>Now we need to give that key read access to the repository. Go to GitHub -&gt; your repository -&gt; settings -&gt; deploy keys and add the contents of the <code class="language-plaintext highlighter-rouge">deploy.pub</code> file:</p>

<p><img src="/asset/img/continuous-deployment-on-a-budget/5.png" alt="github-key" class="img-responsive" /></p>

<p>There is no need to add write access.</p>

<h3 id="add-the-deploy-key-to-travis">Add the deploy key to Travis</h3>

<p>It’s important not to commit the <code class="language-plaintext highlighter-rouge">deploy</code> key to your repository as it will give anyone with that key access to your servers. Luckily, Travis has a mechanism to encrypt the file so that it can use it as part of the continuous deployment pipeline.</p>

<p>To encrypt the key we’ll need to install the travis CLI tool. Note that you will also need to have Ruby installed on your system.</p>

<div class="language-bash highlighter-rouge"><div class="highlight"><pre class="highlight"><code><span class="nb">sudo </span>gem <span class="nb">install </span>travis <span class="nt">-v</span> 1.8.10 <span class="nt">--no-rdoc</span> <span class="nt">--no-ri</span>
travis encrypt-file ./deploy <span class="nt">--add</span>
</code></pre></div></div>

<p>If you inspect your <code class="language-plaintext highlighter-rouge">.travis.yml</code> file you’ll see that some new lines that look similar to:</p>

<div class="language-yaml highlighter-rouge"><div class="highlight"><pre class="highlight"><code><span class="na">before_install</span><span class="pi">:</span>
<span class="pi">-</span> <span class="s">openssl aes-256-cbc -K $encrypted_ad8ca1f2b447_key -iv $encrypted_ad8ca1f2b447_iv</span>
  <span class="s">-in deploy.enc -out deploy -d</span>
</code></pre></div></div>

<p>We can test that key by adding an <code class="language-plaintext highlighter-rouge">after_success</code> block that will log in to the server and run a command:</p>

<div class="language-yaml highlighter-rouge"><div class="highlight"><pre class="highlight"><code><span class="na">after_success</span><span class="pi">:</span>
<span class="pi">-</span> <span class="s">eval "$(ssh-agent -s)"</span>
<span class="pi">-</span> <span class="s">chmod 600 ./deploy</span>
<span class="pi">-</span> <span class="s">echo -e "Host &lt;your-server-ip&gt;\n\tStrictHostKeyChecking no\n" &gt;&gt; ~/.ssh/config</span>
<span class="pi">-</span> <span class="s">ssh-add ./deploy</span>
<span class="pi">-</span> <span class="s">test $TRAVIS_BRANCH = "master" &amp;&amp; ssh -i ./deploy &lt;your-username&gt;@&lt;your-server-ip&gt; pwd</span>
</code></pre></div></div>

<h3 id="setting-up-pm2">Setting up PM2</h3>

<p>Now that Travis has access to the server it’s possible to write a deployment script that will pull the latest code, but restarting the service is a bit more difficult. In order to manage this we can use <a href="https://pm2.keymetrics.io/">PM2</a>, a process manager for node.js.</p>

<p>To get started with PM2 we create an <code class="language-plaintext highlighter-rouge">ecosystem.config.js</code> file in the root of the project:</p>

<div class="language-plaintext highlighter-rouge"><div class="highlight"><pre class="highlight"><code>module.exports = {
    apps : [{
        name: "Your app",
        script: "npm start",
        env: {
            NODE_ENV: "development",
        },
        env_production: {
            NODE_ENV: "production",
        }
    }],
    deploy : {
        production : {
            "ssh_options": "StrictHostKeyChecking=no",
            "key": "deploy",
            "user": "&lt;your-username&gt;",
            "host": ["&lt;your-server-ip&gt;"],
            "ref": "origin/master",
            "repo": "git@github.com:&lt;your-org/your-repo&gt;.git",
            "path": "/home/&lt;your-user&gt;/&lt;project-name&gt;",
            "post-deploy": "npm install &amp;&amp; pm2 startOrRestart ecosystem.config.js --env production",
            "env"  : {
                "NODE_ENV": "production"
            }
        }
    }
};
</code></pre></div></div>

<p>For the purpose of this example I will assume there is already a <code class="language-plaintext highlighter-rouge">npm start</code> script that will start the node.js application but you can put any command in the <code class="language-plaintext highlighter-rouge">script</code> field.</p>

<p>We can test the configuration by installing PM2 locally and starting the service:</p>

<div class="language-bash highlighter-rouge"><div class="highlight"><pre class="highlight"><code><span class="nb">sudo </span>npm <span class="nb">install</span> <span class="nt">-g</span> pm2
pm2 startOrRestart ecosystem.config.js
</code></pre></div></div>

<p>Node.js, git and PM2 need to be installed on the server:</p>

<div class="language-bash highlighter-rouge"><div class="highlight"><pre class="highlight"><code>ssh &lt;your-user&gt;@&lt;your-server-ip&gt;

<span class="c"># assuming a Debian/Ubuntu server</span>
<span class="nb">sudo </span>apt <span class="nb">install </span>git nodejs
<span class="nb">sudo </span>npm <span class="nb">install</span> <span class="nt">-g</span> pm2
</code></pre></div></div>

<p>The final step is to modify the deployment pipeline so that it pulls the latest code and restarts the app:</p>

<div class="language-yaml highlighter-rouge"><div class="highlight"><pre class="highlight"><code><span class="na">after_success</span><span class="pi">:</span>
<span class="pi">-</span> <span class="s">eval "$(ssh-agent -s)"</span>
<span class="pi">-</span> <span class="s">chmod 600 ./deploy</span>
<span class="pi">-</span> <span class="s">echo -e "Host &lt;your-ip&gt;\n\tStrictHostKeyChecking no\n" &gt;&gt; ~/.ssh/config</span>
<span class="pi">-</span> <span class="s">ssh-add ./deploy</span>
<span class="pi">-</span> <span class="s">npm install pm2 -g</span>
<span class="pi">-</span> <span class="s">pm2 deploy ecosystem.config.js production update</span>
</code></pre></div></div>

<p>Now when you trigger a build the latest code will be deployed to your server and the application will be restarted.</p>

<h2 id="thats-it">That’s it</h2>

<p>Your app is now set up for continuous integration and continuous deployment without using a plethora of tools, and best of all, it doesn’t cost a thing.</p>

<p>There is a lot more you can do with Travis, such as reporting code coverage and running functional tests. If you’re are interested you can see a more complete project that has codecov integration and cucumber tests:</p>

<p><a href="https://www.github.com/ecorewards/eco-rewards-hub">https://www.github.com/ecorewards/eco-rewards-hub</a></p>]]></content><author><name></name></author><summary type="html"><![CDATA[Set up a continuous integration and continuous pipeline for free with Travis and PM2]]></summary></entry><entry><title type="html">Implementations of a journey planner based on transfer patterns</title><link href="https://ljn.io//posts/transfer-pattern-journey-planner" rel="alternate" type="text/html" title="Implementations of a journey planner based on transfer patterns" /><published>2019-11-14T09:00:00+00:00</published><updated>2019-11-14T09:00:00+00:00</updated><id>https://ljn.io//posts/transfer-pattern-journey-planner</id><content type="html" xml:base="https://ljn.io//posts/transfer-pattern-journey-planner"><![CDATA[<p class="article-headline">The concept behind <a href="https://ad.informatik.uni-freiburg.de/files/transferpatterns.pdf">Hannah Bast’s transfer patterns</a> is brilliantly simple: pre-calculate all the points a passenger may need to change for every possible journey in the network and perform real-time queries by linking together these points for specific times.</p>

<p>The original paper suggests using <a href="https://en.wikipedia.org/wiki/Dijkstra%27s_algorithm">Dijkstra Algorithm</a> to reconstitute journeys from transfer patterns but does not go in to much detail, this post explores a couple of implementations of a journey planner based on transfer patterns.</p>

<h1 id="a-simple-approach">A simple approach</h1>

<p>There are <a href="/posts/using-directed-acyclic-graphs-to-store-transfer-patterns">a number of ways to store transfer patterns</a>, but for the initial approach it’s best to use a simple list of stops where the passenger changes to another service. For example, the journey <code class="language-plaintext highlighter-rouge">A→E</code> might contain the following patterns:</p>

<div class="language-plaintext highlighter-rouge"><div class="highlight"><pre class="highlight"><code>A,B,C,E
A,B,D,E
A,C,E
A,C,D,E
</code></pre></div></div>

<p>In order to turn these transfer patterns into journeys, process them individually and turn them into a list of origin and destination pairs representing one leg of the journey. For the transfer pattern <code class="language-plaintext highlighter-rouge">A,B,C,E</code> this would be:</p>

<div class="language-plaintext highlighter-rouge"><div class="highlight"><pre class="highlight"><code>[A,B],[B,C],[C,E]
</code></pre></div></div>

<p>Then look up all the trips operating between each pair of stops in the pattern. The relevant part of these trips can be cut into a journey leg that runs between the origin and destination:</p>

<div class="language-plaintext highlighter-rouge"><div class="highlight"><pre class="highlight"><code>A→B
d10:00,a10:30
d11:00,a11:30
d12:00,a12:30
</code></pre></div></div>

<h2 id="creating-an-index-of-trips">Creating an index of trips</h2>

<p>Scanning all the trips in a dataset to extract legs is expensive so it’s best build up an index of trips that pick up and drop off at particular stations when the data set is loaded.</p>

<p>This example code iterates every stop of every journey to create the index:</p>

<div class="language-javascript highlighter-rouge"><div class="highlight"><pre class="highlight"><code><span class="kd">const</span> <span class="nx">legIndex</span> <span class="o">=</span> <span class="p">{};</span>

<span class="k">for</span> <span class="p">(</span><span class="kd">const</span> <span class="nx">trip</span> <span class="k">of</span> <span class="nx">trips</span><span class="p">)</span> <span class="p">{</span>
  <span class="k">for</span> <span class="p">(</span><span class="kd">let</span> <span class="nx">i</span> <span class="o">=</span> <span class="mi">0</span><span class="p">;</span> <span class="nx">i</span> <span class="o">&lt;</span> <span class="nx">trip</span><span class="p">.</span><span class="nx">stopTimes</span><span class="p">.</span><span class="nx">length</span> <span class="o">-</span> <span class="mi">1</span><span class="p">;</span> <span class="nx">i</span><span class="o">++</span><span class="p">)</span> <span class="p">{</span>
    <span class="k">if</span> <span class="p">(</span><span class="nx">trip</span><span class="p">.</span><span class="nx">stopTimes</span><span class="p">[</span><span class="nx">i</span><span class="p">].</span><span class="nx">pickUp</span><span class="p">)</span> <span class="p">{</span>
      <span class="kd">const</span> <span class="nx">origin</span> <span class="o">=</span> <span class="nx">trip</span><span class="p">.</span><span class="nx">stopTimes</span><span class="p">[</span><span class="nx">i</span><span class="p">].</span><span class="nx">stop</span><span class="p">;</span>

      <span class="k">for</span> <span class="p">(</span><span class="kd">let</span> <span class="nx">j</span> <span class="o">=</span> <span class="nx">i</span> <span class="o">+</span> <span class="mi">1</span><span class="p">;</span> <span class="nx">j</span> <span class="o">&lt;</span> <span class="nx">trip</span><span class="p">.</span><span class="nx">stopTimes</span><span class="p">.</span><span class="nx">length</span><span class="p">;</span> <span class="nx">j</span><span class="o">++</span><span class="p">)</span> <span class="p">{</span>
        <span class="k">if</span> <span class="p">(</span><span class="nx">trip</span><span class="p">.</span><span class="nx">stopTimes</span><span class="p">[</span><span class="nx">j</span><span class="p">].</span><span class="nx">dropOff</span><span class="p">)</span> <span class="p">{</span>
          <span class="kd">const</span> <span class="nx">destination</span> <span class="o">=</span> <span class="nx">trip</span><span class="p">.</span><span class="nx">stopTimes</span><span class="p">[</span><span class="nx">j</span><span class="p">].</span><span class="nx">stop</span><span class="p">;</span>

          <span class="nx">legIndex</span><span class="p">[</span><span class="nx">origin</span><span class="p">]</span> <span class="o">=</span> <span class="nx">legIndex</span><span class="p">[</span><span class="nx">origin</span><span class="p">]</span> <span class="o">||</span> <span class="p">{};</span>
          <span class="nx">legIndex</span><span class="p">[</span><span class="nx">origin</span><span class="p">][</span><span class="nx">destination</span><span class="p">]</span> <span class="o">=</span> <span class="nx">legIndex</span><span class="p">[</span><span class="nx">origin</span><span class="p">][</span><span class="nx">destination</span><span class="p">]</span> <span class="o">||</span> <span class="p">[];</span>
          <span class="nx">legIndex</span><span class="p">[</span><span class="nx">origin</span><span class="p">][</span><span class="nx">destination</span><span class="p">].</span><span class="nx">push</span><span class="p">(</span><span class="nx">trip</span><span class="p">.</span><span class="nx">toLeg</span><span class="p">(</span><span class="nx">origin</span><span class="p">,</span> <span class="nx">destination</span><span class="p">));</span>
        <span class="p">}</span>
      <span class="p">}</span>
    <span class="p">}</span>
  <span class="p">}</span>
<span class="p">}</span>
</code></pre></div></div>

<h2 id="completing-the-journey">Completing the journey</h2>

<p>Given a list of legs between every pair of stops, it’s possible to progressively scan through those pairs to find a leg that departs the origin station on or after the target departure time.</p>

<p>After each transfer to the next leg the target departure time is updated to reflect the arrival time of the previous leg.</p>

<p><img src="/asset/img/transfer-pattern-journey-planner/1.png" alt="timetable" class="img-responsive" /></p>

<p>If it is possible to progress to the final leg and find a trip then a complete journey can be made, otherwise the journey is not possible.</p>

<div class="language-javascript highlighter-rouge"><div class="highlight"><pre class="highlight"><code><span class="kd">const</span> <span class="nx">patternStops</span> <span class="o">=</span> <span class="p">[[</span><span class="nx">A</span><span class="p">,</span><span class="nx">B</span><span class="p">],[</span><span class="nx">B</span><span class="p">,</span><span class="nx">C</span><span class="p">],[</span><span class="nx">C</span><span class="p">,</span><span class="nx">E</span><span class="p">]];</span>

<span class="kd">function</span> <span class="nx">getJourney</span><span class="p">(</span><span class="nx">legIndex</span><span class="p">,</span> <span class="nx">patternStops</span><span class="p">,</span> <span class="nx">departureTime</span><span class="p">)</span> <span class="p">{</span>
  <span class="kd">const</span> <span class="nx">legs</span> <span class="o">=</span> <span class="p">[];</span>

  <span class="k">for</span> <span class="p">(</span><span class="kd">const</span> <span class="p">[</span><span class="nx">origin</span><span class="p">,</span> <span class="nx">destination</span><span class="p">]</span> <span class="k">of</span> <span class="nx">patternStops</span><span class="p">)</span> <span class="p">{</span>
    <span class="kd">const</span> <span class="nx">leg</span> <span class="o">=</span> <span class="nx">legIndex</span><span class="p">[</span><span class="nx">origin</span><span class="p">][</span><span class="nx">destination</span><span class="p">].</span><span class="nx">find</span><span class="p">(</span><span class="nx">t</span> <span class="o">=&gt;</span> <span class="nx">l</span><span class="p">.</span><span class="nx">departureTime</span> <span class="o">&gt;=</span> <span class="nx">departureTime</span><span class="p">);</span>

    <span class="k">if</span> <span class="p">(</span><span class="o">!</span><span class="nx">leg</span><span class="p">)</span> <span class="p">{</span>
      <span class="k">return</span> <span class="kc">null</span><span class="p">;</span> <span class="c1">// journey not possible</span>
    <span class="p">}</span>

    <span class="nx">legs</span><span class="p">.</span><span class="nx">push</span><span class="p">(</span><span class="nx">leg</span><span class="p">);</span>
  <span class="p">}</span>

  <span class="k">return</span> <span class="nx">legs</span><span class="p">;</span>
<span class="p">}</span>
</code></pre></div></div>
<!-- ## Transfers

In some cases there may not be a trip available between the origin and destination -->

<h2 id="cleaning-up-results">Cleaning up results</h2>

<p>Doing this for a large number of transfer patterns will result in a long list of journeys, many of which will be redundant as they are slower than other journeys. These can be removed by <a href="/posts/an-algorithm-for-pareto-optimal-journeys">using a filter</a> that removes slower journeys unless they have fewer legs.</p>

<h2 id="range-queries">Range queries</h2>

<p>One of the benefits of this approach is that it is well suited to range queries, where a number of results are required. By extracting all the trips available between the first leg it’s possible to construct a journey for each departure.</p>

<p><img src="/asset/img/transfer-pattern-journey-planner/2.png" alt="timetable2" class="img-responsive" /></p>

<p>As each subsequent journey will only ever arrive at the same time or later, it’s possible to optimize the scanning by maintaining an index of the last leg found for each origin / destination and searching from that point on. This index only applies within the context of a single transfer pattern, other transfer patterns need to maintain their own index.</p>

<h1 id="tree-compaction">Tree compaction</h1>

<p>It’s quite common for transfer patterns to contain a lot of duplication. Looking at the original transfer patterns:</p>

<div class="language-plaintext highlighter-rouge"><div class="highlight"><pre class="highlight"><code>A,B,C,E
A,B,D,E
A,C,E
A,C,D,E
</code></pre></div></div>

<p>The first leg of transfer patterns 1 and 2, and 3 and 4 are the same. By converting the transfer patterns into a directed acyclic graph (a tree) it’s possible to eliminate some of that duplication.</p>

<div class="language-plaintext highlighter-rouge"><div class="highlight"><pre class="highlight"><code>     A
   /   \
  B     C
/   \   | \
C   D   E  D
|   |      |
E   E      E   
</code></pre></div></div>

<p>The overall process is the same but at each node with multiple children the journey so far is cloned and continued down each path independently.</p>

<div class="language-javascript highlighter-rouge"><div class="highlight"><pre class="highlight"><code><span class="kd">function</span> <span class="nx">getJourneys</span><span class="p">(</span><span class="nx">patternNode</span><span class="p">,</span> <span class="nx">legs</span><span class="p">,</span> <span class="nx">departureTime</span><span class="p">)</span> <span class="p">{</span>
  <span class="kd">const</span> <span class="nx">leg</span> <span class="o">=</span> <span class="nx">patternNode</span><span class="p">.</span><span class="nx">findLeg</span><span class="p">(</span><span class="nx">departureTime</span><span class="p">);</span>

  <span class="c1">// journey can't be completed</span>
  <span class="k">if</span> <span class="p">(</span><span class="o">!</span><span class="nx">leg</span><span class="p">)</span> <span class="p">{</span>
    <span class="k">return</span> <span class="p">[];</span>
  <span class="p">}</span>

  <span class="c1">// reached the end of the pattern</span>
  <span class="k">if</span> <span class="p">(</span><span class="nx">patternNode</span><span class="p">.</span><span class="nx">children</span><span class="p">.</span><span class="nx">length</span> <span class="o">===</span> <span class="mi">0</span><span class="p">)</span> <span class="p">{</span>
    <span class="k">return</span> <span class="p">[[...</span><span class="nx">legs</span><span class="p">,</span> <span class="nx">leg</span><span class="p">]];</span>
  <span class="p">}</span>

  <span class="k">return</span> <span class="nx">patternNode</span><span class="p">.</span><span class="nx">flatMap</span><span class="p">(</span><span class="nx">n</span> <span class="o">=&gt;</span> <span class="nx">getJourneys</span><span class="p">(</span><span class="nx">n</span><span class="p">,</span> <span class="p">[...</span><span class="nx">legs</span><span class="p">,</span> <span class="nx">leg</span><span class="p">],</span> <span class="nx">leg</span><span class="p">.</span><span class="nx">arrivalTime</span><span class="p">));</span>
<span class="p">}</span>
</code></pre></div></div>

<h1 id="dijkstra">Dijkstra</h1>

<p>There is still some duplication in the graph, between C-&gt;E and D-&gt;E. The natural continuation of the previous approach is to compact all patterns into a single graph and run a modified version of Dijkstra’s shortest path algorithm. In doing this it is no longer possible to track the last returned journey along each edge of the graph as there is no guarantee that edges are scanned in time order. In my testing this meant that Dijkstra’s algorithm was consistently slower than the previous approach.</p>

<p>Another disadvantage of this approach is it becomes harder to return results from multiple transfer patterns. It will always return the journey with the earliest arrival time, regardless of whether it has more changes.</p>

<h1 id="conclusion">Conclusion</h1>

<p>Transfer patterns are still the fastest way to perform real-time queries, even if they do require a large amount of preprocessing. We’ve seen two novel approaches to journey planning that perform well. The first approach is simpler to implement but does not perform as well on routes with many transfer patterns of a similar nature. The second approach is more complex but performs very well in situations where there is a lot of duplication between transfer patterns. This is especially relevant for queries where the destination is a list of stations rather than a single station.</p>

<p>The original paper recommends using Dijkstra’s algorithm and it is possible that certain implementations of it perform better than these approaches but the simple optimizations make these approaches after than a stock Dijkstra’s algorithm.</p>

<p>Open source implementations of the tree compacted approach is available GitHub:</p>

<p><a href="https://github.com/planarnetwork/transfer-pattern-planner">https://github.com/planarnetwork/transfer-pattern-planner</a></p>]]></content><author><name></name></author><summary type="html"><![CDATA[Practical approaches to implementing a journey planner based on transfer patterns]]></summary></entry></feed>